Showing posts with label canvas art. Show all posts

Friday, July 20, 2012

The Dress - Painting with Plaster

The Dress
Painted with Plaster
Photobucket
Photobucket
The first time I made a painting where the image was made with plaster and then painted over for a 3D effect was in college when I was doing some works for a production at the Yakima museum.  I made six 6x6 ft paintings...each one themed after the music compositions that were being performed.  My sister choreographed a dance to go with each song too so the production was a combination of live jazz, dance and visual art.  It was cool.  The plaster was used on a painting called Punctuation.  I made a huge punctuation mark on the canvas with plaster, then painted the whole canvas a solid color and then splattered it all jackson pollock style...I thought it went with the theme of punctuation with the punctuated marks they left.  ANYWAYS, I really enjoyed using plaster and have wanted to do it again ever since.  I have ALSO been wanting to make a dress painting for a long time too...like .....Then, a few months ago when I was researching faux finishing when I was getting ready to do the bathroom makeover  I discovered Segreto Finishes by Leslie Sinclair and fell in LOVE.  Then I was looking through the Segreto Art Gallery and saw the paintings by Rachel Schwind and saw the paintings she made with plaster and was inspired.  Her dress paintings with plaster are like the perfect combination of the 2 types of paintings I've been wanting to do for the last few years!  So I made this for the master bedroom.  

work in progress...
Photobucket
work in progress....
Photobucket

I wanted to make it more greyish and muted the way Rachel Schwind does, but wanted to have some blue undertones so I painted a mix of grey and teal on the background and then just teal over the dress.  I started adding a white-ish wash to the background..toning it down...but then I couldn't bring myself to do it over the dress...it wasn't what I intended...but I loved the pop of color...it still has the simplicity I wanted anyways.  I used plaster and painted it on with a palette knife.  waited for it to dry and then added paint.  Only mistake...I should have not done this on a canvas...the plaster is cracking like crazy so I am going to get a bunch of midge podge and paint that over top of the whole thing to try to keep it from cracking further and hopefully keep any plaster from cracking too much and falling off!  I would be so sad.  The cracks aren't too noticeable unless you get up and look real close but they make me nervous!  The punctuation painting was on canvas too and there was no cracking...even after trasport in a u-haul but maybe it was because that canvas was so thick and sturdy...these canvases I've been buying are really inexpensive and are light and flimsy...I'm not even sure if it's real canvas..it's almost papery because if I get it too wet...the edges start to fray...so maybe that is the problem.  But large canvases are EXPENSIVE!  This one was $16! and it's a good size!  you get what you pay for I guess.

Photobucket

And after I made this dress painting, my 5 year old, who is dress obsessed, wanted to make a dress painting too and design her own dress so I did a google image search for dress paintings and let her pick out a reference picture and she made this, all by herself and she is so proud of it she keeps saying we need to send it to a factory so they can make it into a real dress.
Photobucket

When she seriously wants to draw something, I sit down and give her a little instruction by drawing the same picture along side her on my own paper and explaining what I'm doing as I go and then she draws hers at the same time.  It's from the Monart method when I was teaching art classes and it's nice because I never touch her picture and she can look at it after and be proud that she did the entire thing by herself.  As you can see I turned mine into a silly clown picture as we painted along side each other.  She wanted it to have polk-a-dots so I had her make the dots with crayons and then paint watercolor overtop, a 5 year old couldn't paint a polk-a-dot dress it would be a mess...so this worked well and kids always love seeing the crayon resist the watercolor.  When is was dry she added glitter.
Photobucket

While doing the google image search for "dress paintings" we found the artist Roxanne Rossi and I am LOVING her dress paintings.  So simplistic and beautiful I had to share!  Almost made me wish I painted something like this instead of the plaster dress....(almost! still love the plaster dress painting)


Thursday, July 19, 2012

DIY Song Lyric Canvas Art

Song Lyric Canvas Art
Photobucket
So if getting a house ready to put on the market and taking care of a 5 and 2 year old aren't enough...Our walls were so bare because we've only been here a year and all the ideas for art I wanted to make...I hadn't gotten around to doing yet.  So as we were staging the house, I decided I was just going to buckle down and make some of the things I had been wanting to try but just haven't had the pressure to actually get it done.  That way, the house wouldn't be SO empty, especially since all we had up were family photos which we had to take down.  PLUS, the now I'll have some new art to hang up right away after we move into a new house and those walls won't be bare like this house has been.  Apparently I can get a lot done when I have no time...funny how that works!  (I've made 3 paintings this week.  I'll post the other 2 soon so stay tuned...and I will admit, there is no time for perfection or reflection so whipping these out..they are what they are and normally I haven't done a lot of painting because I stress about it, taking my time and what not..these are not perfect but it's nice to have them up!)

Pick out a canvas, I purchased a thick 3 x 4 ft canvas at the local craft store that has really cheap canvases...I think this was just over $20.  

To start your song lyric canvas word art, find the lyrics to a song or poem that you really like and then use a photo editing program like picmonkey and add the lyrics/words line by line, editing each line to fit with the font you choose. Make sure you crop/size your template to scale of your canvas...since mine is 3x4 I made my template 3000 x 4000 pixels Here is what my finished template looked like...feel free to use it if you want, it is the lyrics of the song Happy As The Sun by Tyrone Wells (no I'm not OBSESSED but I do really like him and I liked these lyrics as I wanted a happy song that I could tell my husband and kids that it was about them).  
Photobucket

Take your finished template and upload it to a website like blockposters and select the size you want to print your image too and it will print your image onto the right amount of pages, blowing it up to the size you want.  now this isn't perfect...The template still ended up being a little bit bigger than my cnavas, which worked out since I had the thick canvas I just decided to wrap the words around the sides to make it fit without cutting any words out.  Print out the template and then trim all the pages and tape together.  Mine printed out onto 24 pages that I trimmed and taped together.
Photobucket

Now prep your canvas, if you want.  You could just paint the lyrics right onto the white canvas, but I didn't want mine to by stark white so I painted grey around the canvas, leaving some areas white...then after that was dry, I added a few washes of watered down white paint so there is subtle variation in the tone but nothing dramatic and it's not bright white.  
Photobucket

Take some sidewalk chalk (it wipes off easy without leaving the canvas dirty) and scribble the back of the top section of your template.
Photobucket

Lay it over the canvas, making sure it's straight and then use a pencil and trace over the letters to make a light transfer onto the canvas.  Now the chalk doesn't show up a TON but enough to make a guide so that the basic shape and spacing of the letters are consistent.   But to make sure I didn't mess it up or in case certain letters didn't show up well, I placed the template right below so I could also have a visual reference of what it was supposed to look like.
Photobucket

When I was done with one line, I would cut it off so the next line would by there, right below the line I was working on.  
Photobucket
Photobucket

Once you work through the first section, remove the template and scribble chalk on the next section and transfer...working your way down the canvas.
Photobucket
Photobucket

I used a small, flat edge paint brush and japanese sumi ink to paint on the lyrics.  I like the sumi ink because it flows on so nicely...I've painted words with paint before as well and you can use that if you want, but I just think the ink is much faster and flows better, especially for a more scripty font like I used.  
painted words, song lyrics, poem, canvas, art, words, script, painted words, song lyrics, poem, canvas, art, words, script

Once you are finished, make sure the ink/paint is totally dry, then you can wipe the canvas down with a cloth to get rid of all the excess chalk.  Then take some sand paper and lightly sand to your hearts content.  I didn't want the painting to be very bold and the black ink was so dark, bold and a bit shiny so I sanded away...and certain words that I wanted to pop out I sanded less.  Also, certain letters or words that were maybe a little messed up...I sanded those down a LOT which made the errors almost unnoticeable.  :)
painted words, song lyrics, poem, canvas, art, words, script, distressed

Now, Hang it up and enjoy!  I spent 1 morning on this, getting done just before it was time to feed the kids lunch...thankfully they were enjoying being friends and playing in the playroom without incident that morning otherwise this would have taken much longer.  
Photobucket


Tuesday, March 20, 2012

Chalkboard Bakery Sign on Canvas

Faux Chalkboard Bakery Sign on Canvas

 
I originally saw this cool bakery sign wall decor on a blog header over at Junkin Junky about a year ago, and she has since changed the image on her blog header so I can't really show you.  A couple months later I was looking for it (this was before pinterest) and found the bakery sign over at the Curious Sofa, although it's not there anymore either, but luckily I saved it because I FINALLY did it!  
Here is the original from curious sofa 
                                                            

I started with a 12x24 inch gallery wrapped canvas that I got on sale really cheap years ago...before I even became a mom, which was at least 5 years ago as JJ's bday comes up next week!  I didn't have any black acrylic paint, so I used J's Black Tempura/Poster Paint but due to my painting classes from college, I still have a difficult time using any paint straight from the tube...even black, so I mixed the black with some of my burnt umber...don't know if it made any difference, but oh well...I painted the entire canvas black.


Then I put a piece of chalk in a bag and smashed it with a hammer.  I used a wide dry paint brush and brushed the chalk powder onto the black canvas to make it look like a chalkboard.  Who needs chalkboard paint when  you can use black poster paint and basic crayola chalk to make a faux chalkboard finish?
 

I inverted the original image from curious sofa and enlarged it to the size I wanted in word and had it print onto several pages.  Then did the ol scribble chalk on the back and trace the letters onto the canvas.  I did try practicing my freehand at first which wasn't terrible, but I just wanted it to be uniform and even and so I traced the lettering on. 


 When I started, I planned to paint the letters with white paint, but right before starting thought...um since I'm making it look like a chalkboard...why don't I just use chalk? duh...


 To keep the chalk for smudging and wiping off, I took it out to the garage and sprayed it with fixative. You can find that in the drawing section a store that carries art supplies.


 I made this chalkboard bakery sign to go next to the door to the deck because there are two empty areas of wall, on the opposite wall, I just threw up this pizza paddle we already had.


 There...better than having nothing up there on those walls....slowly getting the house less bare.

 I just had to take a pic from this angle because I love the light fixture and brick fireplace in the kitchen...


Best part of the new kitchen decor?  It was free!  I just used things that I've had on hand.

To see how to enlarge images to print on multiple pages click HERE
To see how to transfer images as I did with the type on this project, click HERE


FYI- an update from last nights post...NO POOPY DOOPY DISASTERS this morning!!! THANKS FB friends for your help!!!

Friday, October 21, 2011

Sneak Peak at my inventory in progress!

Since I keep mentioning I'm getting ready for my first arts and craft fair, I thought I'd give a sneak peak at my works in progress...some finished...most not so finished...I'm a big procrastinator....I work better under pressure! haha!  A self induced curse sorta, my younger bro is the same way...:P  (love ya Joey!)

Anyways, today I will be assembling a lot of the headbands, everything is ready to go! I'd like to make some more ties, I have other fabrics I haven't gotten to yet but we'll see!  I have a love hate relationship with sewing due to my $50 brother sewing machine from walmart!  If I don't want to totally kill my motivation to sew things I'm going to have to upgrade to a better sewing machine in the near future!  I have made a lot of stuff with that sewing machine but man, every other seam the tension seems to magically change by itself, or the thread jams, breaks, and I might break my seam ripper before I break my machine!!! Anyways...ok that's not what I'm blogging about so onto some pics..

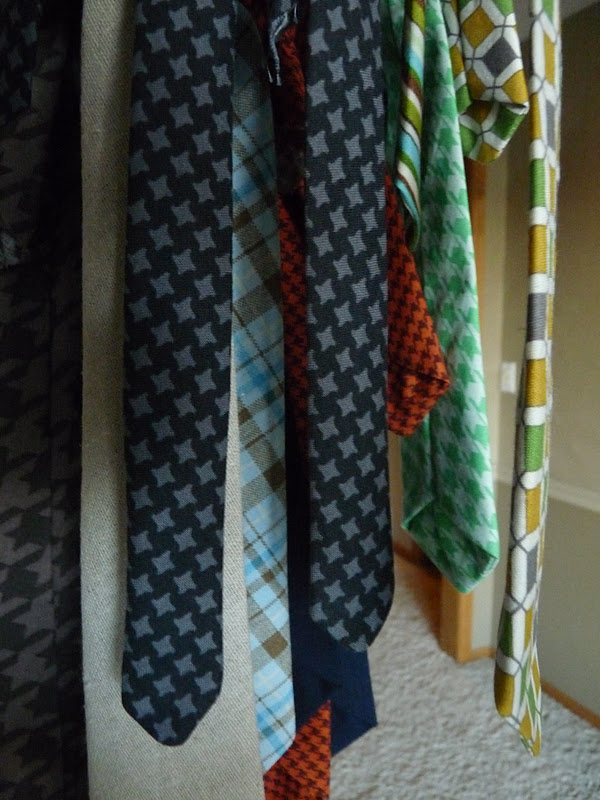
I think there are around 30 finished ties....I hope to get a few more done and some bow ties too. These neck ties have been like, almost a year in the making...well since the beg of this year when I whipped one up for Bronson's birthday pictures and have been wanting to make more.  These are more of a fall winter collection of fabrics....
 Appliqued scotty dog
 green houndstooth
 classic plaid
 brown houndstooth tie
 love yellow and grey
 rusty orange houndstooth tie
 neutral applique deer tie
 applique terrier dog tie on a classic preppy navy blue fabric

 black and grey skinny ties for the hipster babies/kids
I wasn't planning on doing headbands originally, but needed a break from my sewing machine and the ties and after my sister loved the headbands I sent for her baby girl, I started getting into it.  I knew how to make the rolled fabric flowers but Crystal from wannabebalanced got me addicted to making these flowers where you singe the edges.
 
I got the crochet headbands in the ribbon section on spools so I had to cut and sew them to make the headbands, there were smaller sections left over so I made a couple bracelets with the leftovers..I also have some brown crochet bands to sew and some of the brown stretchy ribbon lacey kind like that white in the picture.  I'll have to post some of the finished headbands when they are all done
 Head bands sewn and ready to be decked out
Here are some of the flowers for the headbands and bracelets, i enjoyed embellishing some of the flower edges with glitter...adding a little bling!

 
I have more canvas art to make

yeah....i need to organize this room a bit (yes it's a disaster!)....That's why I keep the door closed.