Showing posts with label diy decorating. Show all posts

Tuesday, May 8, 2012

Summer Mantle Decor, Flowers and Starter Garden

Summer Mantle Decor 
from around the house

Nothing beats free decor!  I needed to swap out my easter mantle for something more summery, so I spent 10 minutes looking rounding up some stuff from around the house.  It's not perfect or the coolest mantle decor but I think I'm slowly improving in switching up the mantle and arranging things...from May-Dec of last year the mantle was very bare with like a small picture and a couple other things and just looked dumb.

The picture frame was in my daughter's bathroom, the clam and basket of sea shells (and the shells in the glass cylinders from the $1 store are all from the beach in Madison, CT)  

The pink wreath I picked up at a church yard sale for $2

 The green bottle was a bottle of sparkling cider from thanksgiving, I had the stems in the craft room, the conch shell was a centerpiece from a wedding 5 or 6 years ago...and my friend gave me the white vase as a gift last year

I love these shells


I might switch it up, but I think it's better than it was before and all I did was look around the house to see what I had.  It's fun to challenge myself to be resourceful and figure out how to use what I have rather than going out and trying to buy everything new each season!

I also planted some lillies...we'll see how they hold up!


Here is the start to our first garden!  If you know what those are growing in front, then you will also know that I am an idiot.  I got all excited and started planting seeds in these starter cells with the kids...then when I was telling my mom what we planted she laughed and said we were supposed to plant the carrots straight into the ground...how are they going to grow in these small things??!?  So yeah...didn't really think it through or obviously read the package that closely because when I went back and looked there was an actual picture showing it being planted right in the ground.


We are going to build our raised garden bed this weekend hopefully....we need to get it ready and move those carrots!  It's a good thing my husband is really interested in having a garden, he wants to grow tons of tomatos and he'll probably be the one to make sure it stays healthy...I am determined, but I've just had bad luck with every pot of plants I've ever had so I'm trying not to set myself up for disappointment.  My mom knew my hesitation so she surprised me with a subscription to Organic Gardening to help inspire me...and..it did.  But I'll never have a garden as awesome as hers...


Wednesday, April 4, 2012

Easter Mantel and Peeks of Spring

Easter Mantel

and peeks of spring as it comes...


I just remembered this chocolate ceramic east bunny that my mil gave me last fall and was excited when I realized I actually DO have some Easter decor!  The white pitcher was a gift from a long time forever friend last year and the topiary is from tj maxx, I had it in the kitchen but moved it over to the mantel today.  The glass hurricanes are from the dollar tree along with the candy inside (left over decorations from the birthday party).  The white pitcher is holding a coffee filter flower bouquet that J made with my mom while they were here last week, an oldie but goodie project you can view here. It's simple but it's nice to have something different up on the mantel, it's lighter and more colorful than what I had before.  I must admit my friend Whitney inspired me to look around and find something to decorate with because she always has her house SO cute and perfect for every holiday and season.  If she ever changed jobs she would be great as a personal organizer, shopper, decorator, etc.

And over the past 2 weeks, spring has really come on strong with wonderful 70-80 degree weather!  And while my parents were here last week my dad was going around fixing things...like the toilet upstairs, the sliding door on the van and even our fountain!  We have tried to figure out how to turn it on since we moved in the house and gave up... apparently it just needed a new pump, my dad solved the problem and got it up and running and I LOVE it...I open my windows in the morning and then get back in bed and listen to the birds and the water trickling outside....ahhh....

 With all the blossoms coming out, I decided it was time to set up the hammock!


I LOVE SPRING!!!
Has spring made it's debut where you live yet?  I know we are lucky it came kind of early for our area, making it an easier transition from leaving Dallas, where the tulips were out in February...still miss it though!

Tuesday, March 20, 2012

Chalkboard Bakery Sign on Canvas

Faux Chalkboard Bakery Sign on Canvas

 
I originally saw this cool bakery sign wall decor on a blog header over at Junkin Junky about a year ago, and she has since changed the image on her blog header so I can't really show you.  A couple months later I was looking for it (this was before pinterest) and found the bakery sign over at the Curious Sofa, although it's not there anymore either, but luckily I saved it because I FINALLY did it!  
Here is the original from curious sofa 
                                                            

I started with a 12x24 inch gallery wrapped canvas that I got on sale really cheap years ago...before I even became a mom, which was at least 5 years ago as JJ's bday comes up next week!  I didn't have any black acrylic paint, so I used J's Black Tempura/Poster Paint but due to my painting classes from college, I still have a difficult time using any paint straight from the tube...even black, so I mixed the black with some of my burnt umber...don't know if it made any difference, but oh well...I painted the entire canvas black.


Then I put a piece of chalk in a bag and smashed it with a hammer.  I used a wide dry paint brush and brushed the chalk powder onto the black canvas to make it look like a chalkboard.  Who needs chalkboard paint when  you can use black poster paint and basic crayola chalk to make a faux chalkboard finish?
 

I inverted the original image from curious sofa and enlarged it to the size I wanted in word and had it print onto several pages.  Then did the ol scribble chalk on the back and trace the letters onto the canvas.  I did try practicing my freehand at first which wasn't terrible, but I just wanted it to be uniform and even and so I traced the lettering on. 


 When I started, I planned to paint the letters with white paint, but right before starting thought...um since I'm making it look like a chalkboard...why don't I just use chalk? duh...


 To keep the chalk for smudging and wiping off, I took it out to the garage and sprayed it with fixative. You can find that in the drawing section a store that carries art supplies.


 I made this chalkboard bakery sign to go next to the door to the deck because there are two empty areas of wall, on the opposite wall, I just threw up this pizza paddle we already had.


 There...better than having nothing up there on those walls....slowly getting the house less bare.

 I just had to take a pic from this angle because I love the light fixture and brick fireplace in the kitchen...


Best part of the new kitchen decor?  It was free!  I just used things that I've had on hand.

To see how to enlarge images to print on multiple pages click HERE
To see how to transfer images as I did with the type on this project, click HERE


FYI- an update from last nights post...NO POOPY DOOPY DISASTERS this morning!!! THANKS FB friends for your help!!!

Sunday, February 5, 2012

Bathroom Redo

Bathroom Reveal

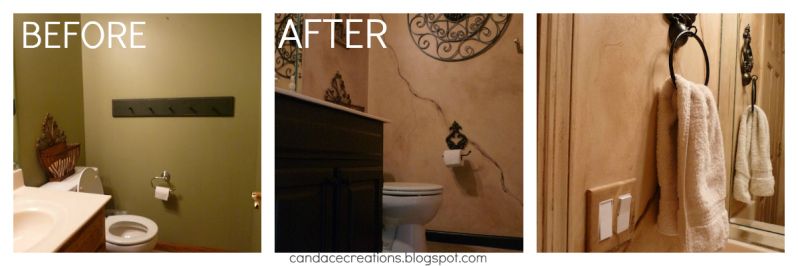
Well this is one of those "reveals" where I'm a little apprehensive to share...it's not TOTALLY done because we need to paint the trim and woodwork, but I'm done with this project for now I need a break!  
The original paint in this bathroom was not looking so great, there were tons of water streak stains on all the walls...I think mainly due to the fact that the towel rack was no where near the sink so people were walking around with wet hands which were then dripping down the walls?  Anyways, I picked up some metal decor from Hobby Lobby 50% off and we wanted to go with an old world rustic look, using a faux finish on the walls.  But here is what happened...the tan color I picked out as the base went on and looked more like a creamy, peachy skin color...I felt like I was surrounded by skin.  So instead of just a light faux finish, I ended up doing a heavier, more dramatic faux with dramatic cracks in the walls to cover up the awful base color.  I also painted the cabinets and doors the same light color and started glazing them but it wasn't looking that great (I'm new to this stuff) and my husband said the door looked like it was covered in "diarreah juice" okay sorry for that gross description, that is just his sense of humor...I originally wanted to go darker with the woodwork anyways so I think that's what we will do now.  
Still can't decide if I like it...I've spent way too much time in that small bathroom over the last 3-4 nights and feel totally indifferent....don't know what to think of it.  I also want to put a decorative bracket type thing with a vase of flowers above the toilet possibly?  

Anyways, here is the before and after....and who knows...maybe there will be another "after" down the road if I decide I don't like this and redo the whole thing again!  Maybe at least an update after painting the trim and woodwork differently.


Here is when I had all the colors up to pick from...and of course the one I got ended up looking nasty and NOT like cappuccino! haha The swatch I went with was the 3rd in from the right on the 2nd to last row....
I did find out  after bringing home a ton of swatches that the main color throughout our house is Bistro Chair!


 See, need a different color on door and trim because it's too much the same...


Mod Podged/hotglued paper over the light switch cover


Here is the faux "process" I did (really was experimenting)

 Made a glaze with burnt umber and raw umber acrylic paint mixed with water and smeared a bunch on randomly with a 4 inch paintbrush....then take a wet rag, wring out all the water and then smear it, wipe it and dab it around until it looked like this....I would also go back with an almost dry paintbrush and do crosshatching to blend and texturize it as well

Anyways....did I ruin my bathroom? Last night I dreamed that I started over and painted the walls a solid darker color with light trim...

UPDATED PIC AFTER PAINTING CABINET AND BASEBOARDS with BEHR French Roast (or espresso roast...something to that effect)


Wednesday, September 7, 2011

DIY Decorating - Branches

Branch Antlers
DIY Decorating

I have a confession to make, I've been kind of a yard waste hoarder lately...after each storm we've had, I save all the branches that fall from the tress because I think they can be turned into great items for the home! (I just heart branch decor) My first easy DIY Decorating project using branches was in my daughters room which you can see here (still need to add the birds).  About a week after setting up her tree branches, I saw these "Branchlers" by custom furniture maker Luke Bartels and I couldn't help myself.  Even Todd Oldham has put a pair of these branchlers up in his home.  I have been slowly working on my little guys room and I've been wanting it to be northern outdoorsy, kind of a woodland theme, but rustic and modern with soft colors for a baby at the same time.  Anyways, it's a WORK IN PROGRESS....to say the least...but I made these branch antlers out of one of the branches from my stash and now he has 2 things on his nursery walls! (hey it's progress :) The other item is the When I Grow Up I want to be like My Daddy sign I made last week)   This branch decor was really simple, I will show you in pictures how I did it.

I should also mention, this is a super fast and easy project...one of the easiest, effortless diy projects I have done.  (This cost $2.27 to make as I bought the wood plaque and hanging hardware..however there are at least 3 or 4 more pieces of hanging hardware left over)

Supplies
Wood Plaque (got mine at hobby lobby for $0.99 it was 50% off)
instant coffee and water....make a really strong dark coffee
foam brush
hanging hardware kit (found in the same area as the wood plaque for $1.27 for a little baggy of them)
tree branch or branches
garden clippers
glue gun and glue
rope

 I stained the wood with very dark brewed coffee and did 2-3 coats. See picture below for before and after color comparison.

Position your hanging hardware so it is straight and use a small hammer to attach it to plaque.

Find a good branch or 2 branches that will make good antlers and clip them to shape your branch antlers...

Clip the bottom tip of your antlers at an angle so you can line them up flush against the plaque...

Heat up your glue gun.  Make a big pile of hot glue centered on the lower part of your plaque.  Affix your branch antlers, adjust the the branches to how you like and then hold in place till the glue dries.
 This one branch took extra long to secure so I just propped it up...

Loop a rope around the base of your branch antlers and secure with hot glue.