Showing posts with label cheap. Show all posts

Monday, July 16, 2012

Quick DIY Fireplace Update

Quick Easy 
DIY Fireplace Update


I have been doing tons of projects big, small, tedious, creative...you name it!  This May was our 1 year anniversary of living here in our first home and just as we were really feeling settled and starting to know what we wanted to do decorating wise (it took me a long time)...a great opportunity came up and my hubby's job is taking us to Georgia.  Our house was in great shape when we moved in a year ago so you wouldn't think there would be much to do to get it ready to go on the market....but there is still a lot to do.  One of the first, simple updates I did was paint the gold trim on the fireplace.  Our realtor said she spray painted hers black and I could not believe how brave she was to spray paint inside her house!  But I loved the idea so I found Krylon Satin Back Acrylic Latex Enamel paint at Walmart in the spray paint section and painted it on with a foam brush and it turned out perfect...I am so sad I didn't do this sooner so I could have enjoyed it more before listing the house (which will happen sometime within the next week).  $4 well spent!!!
I've done a couple other simple updates and projects so stay tuned...I've learned my lesson and will do these simple things right away in our next house!  (ps...So sad to sell this house...we LOVE it).

Here is the BEFORE.....outdated gold metal trim....

Here's all you need
                                      

Tape off the glass and handles if needed.

Here's how the first coat looked...I had a moment of panic if it was going to turn out super crappy...

Here is the second coat...looking a bit better....don't worry it dries pretty fast..5-10 minutes between coats
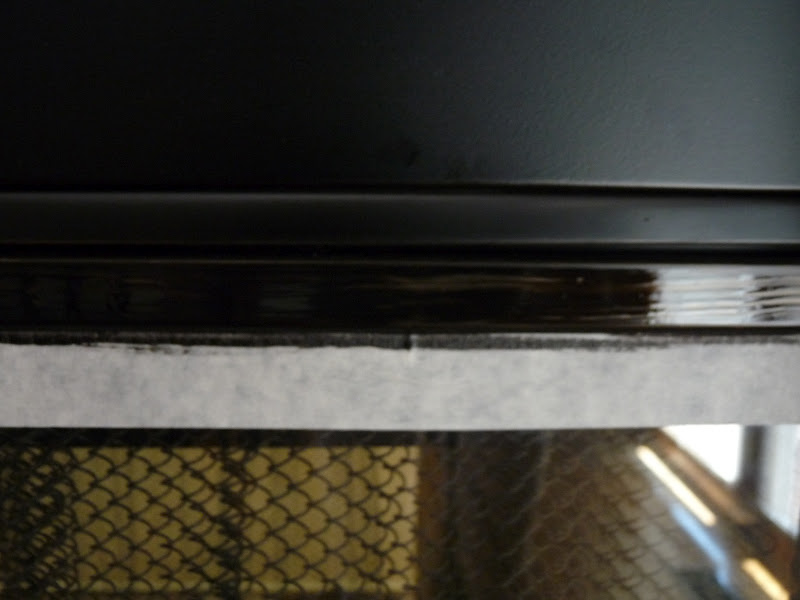
 Here is the 3rd coat.....
 and after the 4th coat (for good measure)

This is AFTER

So much better right?


Thursday, June 7, 2012

Pink Ceiling Fan Chandelier Makeover


  DIY Girls Ceiling Fan Chandelier
So this is a recent project I completed but took a while to share because I had to wait for my hubby to have time to install the fan.  This white ceiling fan had gold hardware and used to be in the master bedroom, we updated our room with something we liked better but our daughter J said she thought the white fan was beautiful and wanted it in her room.  She had an older uglier brown and gold ceiling fan light fixture in her room.  So I got some Rust Oleum in Berry Pink GLOSS and quickly took the fan apart which was super easy and spray painted the hardware pink.  Once it was installed and hanging up, I draped these jeweled garlands that I found in the wedding section at Hobby Lobby they were maybe $5 each or less with 50% off.  For the beaded strands in the center of the chandelier fan, I used some jewelry wire to attach  it to the bottom of the fan as you can see if you look closely.  It took a long time to get this project fully complete...but the project itself was really easy and quick to do...just got drawn out because it didn't match the mounting hardware from the old fan and hubby didn't have time right away to hang it...but here it is...my daughter loves her pink chandelier fan!  We have been turning her fan on at night and if we keep it on the low setting, the jewels on the chandelier don't jiggle around much at all...but on the 2nd and 3rd settings they begin to sway and make some noise so if you want to do this just keep that in mind and make sure you just use the fan on the low setting.

Stay tuned for more reveals from my little girls bedroom makeover! :)

Simply take your fan apart, keep track of where everything goes and then lay out on cardboard and paint with a glossy spray paint.  When paint is completely dry, reassemble your fan.

Install ceiling fan (see owners manual instructions if needed)

Drape jeweled garlands over the lights and metal posts.

Using jewelry wire, attach beaded/jeweled strands to hand from the center of the fan.

ENJOY!  SO CUTE AND GIRLY!  

Spray paint $4
Jeweled garlands $10-15 roughly

Update and turn an old ceiling fan into a super cute girly chandelier fan for less than $20!!!


Tuesday, May 8, 2012

Summer Mantle Decor, Flowers and Starter Garden

Summer Mantle Decor 
from around the house

Nothing beats free decor!  I needed to swap out my easter mantle for something more summery, so I spent 10 minutes looking rounding up some stuff from around the house.  It's not perfect or the coolest mantle decor but I think I'm slowly improving in switching up the mantle and arranging things...from May-Dec of last year the mantle was very bare with like a small picture and a couple other things and just looked dumb.

The picture frame was in my daughter's bathroom, the clam and basket of sea shells (and the shells in the glass cylinders from the $1 store are all from the beach in Madison, CT)  

The pink wreath I picked up at a church yard sale for $2

 The green bottle was a bottle of sparkling cider from thanksgiving, I had the stems in the craft room, the conch shell was a centerpiece from a wedding 5 or 6 years ago...and my friend gave me the white vase as a gift last year

I love these shells


I might switch it up, but I think it's better than it was before and all I did was look around the house to see what I had.  It's fun to challenge myself to be resourceful and figure out how to use what I have rather than going out and trying to buy everything new each season!

I also planted some lillies...we'll see how they hold up!


Here is the start to our first garden!  If you know what those are growing in front, then you will also know that I am an idiot.  I got all excited and started planting seeds in these starter cells with the kids...then when I was telling my mom what we planted she laughed and said we were supposed to plant the carrots straight into the ground...how are they going to grow in these small things??!?  So yeah...didn't really think it through or obviously read the package that closely because when I went back and looked there was an actual picture showing it being planted right in the ground.


We are going to build our raised garden bed this weekend hopefully....we need to get it ready and move those carrots!  It's a good thing my husband is really interested in having a garden, he wants to grow tons of tomatos and he'll probably be the one to make sure it stays healthy...I am determined, but I've just had bad luck with every pot of plants I've ever had so I'm trying not to set myself up for disappointment.  My mom knew my hesitation so she surprised me with a subscription to Organic Gardening to help inspire me...and..it did.  But I'll never have a garden as awesome as hers...


Wednesday, April 4, 2012

Easter Mantel and Peeks of Spring

Easter Mantel

and peeks of spring as it comes...


I just remembered this chocolate ceramic east bunny that my mil gave me last fall and was excited when I realized I actually DO have some Easter decor!  The white pitcher was a gift from a long time forever friend last year and the topiary is from tj maxx, I had it in the kitchen but moved it over to the mantel today.  The glass hurricanes are from the dollar tree along with the candy inside (left over decorations from the birthday party).  The white pitcher is holding a coffee filter flower bouquet that J made with my mom while they were here last week, an oldie but goodie project you can view here. It's simple but it's nice to have something different up on the mantel, it's lighter and more colorful than what I had before.  I must admit my friend Whitney inspired me to look around and find something to decorate with because she always has her house SO cute and perfect for every holiday and season.  If she ever changed jobs she would be great as a personal organizer, shopper, decorator, etc.

And over the past 2 weeks, spring has really come on strong with wonderful 70-80 degree weather!  And while my parents were here last week my dad was going around fixing things...like the toilet upstairs, the sliding door on the van and even our fountain!  We have tried to figure out how to turn it on since we moved in the house and gave up... apparently it just needed a new pump, my dad solved the problem and got it up and running and I LOVE it...I open my windows in the morning and then get back in bed and listen to the birds and the water trickling outside....ahhh....

 With all the blossoms coming out, I decided it was time to set up the hammock!


I LOVE SPRING!!!
Has spring made it's debut where you live yet?  I know we are lucky it came kind of early for our area, making it an easier transition from leaving Dallas, where the tulips were out in February...still miss it though!

Tuesday, March 20, 2012

Chalkboard Bakery Sign on Canvas

Faux Chalkboard Bakery Sign on Canvas

 
I originally saw this cool bakery sign wall decor on a blog header over at Junkin Junky about a year ago, and she has since changed the image on her blog header so I can't really show you.  A couple months later I was looking for it (this was before pinterest) and found the bakery sign over at the Curious Sofa, although it's not there anymore either, but luckily I saved it because I FINALLY did it!  
Here is the original from curious sofa 
                                                            

I started with a 12x24 inch gallery wrapped canvas that I got on sale really cheap years ago...before I even became a mom, which was at least 5 years ago as JJ's bday comes up next week!  I didn't have any black acrylic paint, so I used J's Black Tempura/Poster Paint but due to my painting classes from college, I still have a difficult time using any paint straight from the tube...even black, so I mixed the black with some of my burnt umber...don't know if it made any difference, but oh well...I painted the entire canvas black.


Then I put a piece of chalk in a bag and smashed it with a hammer.  I used a wide dry paint brush and brushed the chalk powder onto the black canvas to make it look like a chalkboard.  Who needs chalkboard paint when  you can use black poster paint and basic crayola chalk to make a faux chalkboard finish?
 

I inverted the original image from curious sofa and enlarged it to the size I wanted in word and had it print onto several pages.  Then did the ol scribble chalk on the back and trace the letters onto the canvas.  I did try practicing my freehand at first which wasn't terrible, but I just wanted it to be uniform and even and so I traced the lettering on. 


 When I started, I planned to paint the letters with white paint, but right before starting thought...um since I'm making it look like a chalkboard...why don't I just use chalk? duh...


 To keep the chalk for smudging and wiping off, I took it out to the garage and sprayed it with fixative. You can find that in the drawing section a store that carries art supplies.


 I made this chalkboard bakery sign to go next to the door to the deck because there are two empty areas of wall, on the opposite wall, I just threw up this pizza paddle we already had.


 There...better than having nothing up there on those walls....slowly getting the house less bare.

 I just had to take a pic from this angle because I love the light fixture and brick fireplace in the kitchen...


Best part of the new kitchen decor?  It was free!  I just used things that I've had on hand.

To see how to enlarge images to print on multiple pages click HERE
To see how to transfer images as I did with the type on this project, click HERE


FYI- an update from last nights post...NO POOPY DOOPY DISASTERS this morning!!! THANKS FB friends for your help!!!