Showing posts with label crafts. Show all posts

Wednesday, March 13, 2013

St. Patrick's Day Reading, Math and Craft Activity

St. Patrick's Day 
Reading, Math and Craft Activity
for Homeschool


This is the first year we have really done anything St. Patrick's Day themed.  Last year we did a lephrechaun craft with friends but that was it.  I think seeing all the fun St. Patrick's Day fun Crystal from Wanna Be Balanced has been posting has been making me feel like a holiday slacker lol, seriously, check out everything they have been doing that is St. Patrick's Day themed!

So we started out by finding this fun little song that teaches about St. Patrick's Day and so that is how we learned what it is all about.  I thought it was quite interesting, I never had any clue what St. Patrick's Day is other than people wear green and lots of people get drunk.  


We started out with our rainbow craft. My daughter held up a scrap strip of paper and said "I want to make a rainbow with this!" and that is how we came up with the idea to make more strips of colored paper, fold them accordion style and create a standing rainbow.  For the base we used a recycled cereal box covered in sky blue paper.  To fasten the rainbow strips we used the glue gun...I thought with elmers glue it might dry to slowly to hold them in place and I get impatient with that kind of stuff...so we use the glue gun a lot!  When making the rainbow, you have to make the colors on the bottom progressively shorter than the ones on the top, we started with them all the same length and then just glued and trimmed as needed.

For our reading pot of gold activity I wrote some of the sight words that J has been working on lately, some she knows and others that she needed more practice with, on yellow paper and then put it through the laminator and cut them out in circles.  I put them in the pot (which was from halloween) and then hid the pot in the play room with their rainbows.  I put a few strips of fabric leading into the playroom for a following the rainbow effect to lead them to the pot of gold.  


(sure gonna miss this playroom....sigh)


Once they found the pot of gold, J had to read each coin if she wanted to keep it.  B decided to join in and started reading off letters that he knew so he could keep some too.  The words she missed on the first try went back in the pot and then she was able to try again to keep them.  After collecting their coins we came downstairs and I had her figure out how much money her gold coins were worth.  I had made a key for how much each word was worth with values from $0-$10.  I had her locate the words on the key and then type the value into the calculator to tally up her total.  Then I had her tally up the total of B's coins (which gave her a chance to read those words too).  Then I had her calculate how much all the coins we worth all together.  The next thing we did was arrange them into piles of 2 letter words, 3 letter words, 4 letter words and 5 letter words and she recorded how many coins were in each category and identified fewest, most, etc.  I just kept making her think of them in different ways.  The last activity we did was a page of mystery addition that I made up.  I wrote equations like have+said=   and she had to use the key that listed each words value to figure out the true equation and get the answer...so there was a lot of reinforcement with using the sight words as well as math going on....and there was NO COMPLAINING!!!!  that was nice for a change...I need to make it more fun like this more often.  I was better before Christmas but then since being pregnant I was so tired the first trimester...school got kind of boring...good thing 2nd trimester is giving me some energy back to get more creative and fun with school again!


And here is my belly at 14.5 weeks....I'm finding the 3rd time around, things change a lot more quickly!!!


Friday, April 20, 2012

MOPS Crafts

MOPS Craft Ideas

As our MOPS year wraps up, I thought I would share some of the crafts we did that were all pretty simple and fun and went over well with our MOPS moms in case you are a craft leader and looking for some ideas for your group next year or just looking for some simple craft ideas that also make cute gifts. Some of the crafts we did this year were

Chalkboard Picture holder 

I made mine a counter downer for when my husband has to travel.  Other ideas could be birthdays, what's for dinner, or just where you leave love notes for your spouse or child...and whoever it's for you can stick a picture on the top in the little coil of them...I wasn't on the craft team at that time so I'm not sure where they got the idea or what the prep was like but it was fun.


Sugar Scrub

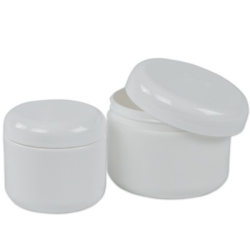
We purchased plastic tubs for less than a dollar a piece here.  Then just had the girls make a basic sugar scrub with white sugar, oil and a few drops or essential oil (optional).  Then we had stickers they could add as labels and some glued a wide ribbon around the container to decorate.  

Handmade Envelopes
Up-cycling 

Our theme for this craft was up-cycling, so we had magazines, catalog pages and newspapers that we put out for the girls to choose from.  We also had templates for them to cut out their envelope and then quickly assemble.  We just made these at our discussion groups because it was so simple, but it was really fun, easy, and I heard a few of the moms had fun using their homemade envelopes to send cards to friends and family.  We also put out some scrapbooking stamps and punches with cardstock for them to embellish with.  The Restoration Hardware catalog made awesome envelopes!  Here is a link with templates and tips for making your own envelopes.

Holiday Christmas Clothespins


This was a really inexpensive craft for the group.  We got the idea from Blue Cricket Designs  hot glued magnetic strips onto the backs of all the clothespins so they could be used as fridge magnets but as she mentions in the original post you could include a ribbon for them to be strung along a mantle for displaying Christmas cards.  What a fun little project!!!

I Spy Bottles 
(a sensory activity for the kids)

Two of our other craft leaders took on this project and dyed the rice, enough for 70-80 women!  Apparently they dyed it similar to the way you would dye easter eggs and then spread it out on tarps in their garage to dry.  Once it was dry they mixed it all together in a big plastic storage tub.  They also ordered clear plastic beef jerky containers Here but you could just recycle an clear plastic bottle too, using what you have on hand.  We then filled the containers with little things to spy such as foam letters, paper clip, buttons, a small butterfly bead, heart and airplane, penny, smiley face bouncy ball, a rubber band, star bead, frog and a marble. They made little labels with what is in side so the kids know what to look for and what they haven't found yet.  This one went over really well too, and the kids loved it!  We had it set up on 2 long tables, the moms came through, picked up a container, filled it 2/3 full with rice, then went through adding the various trinkets (we each bowl of things labeled with how many they should add such as 3 letters, or 1 of each for most of the other things), then they put some tacky glue on the inside of the lid and screwed it on.  Then used some clear packing tape and added the label and that was it!

Jars with Decorative Lids
from the Nate Burkus Show


So this project came from the Nate Burkus show and was really fun, you can see the tutorial here!  Those of us on the craft team took turns being in charge of each craft and our gal who presented this idea and took it on did awesome and she had to collect a lot of jars so we would have enough for everyone (70-80) and she pulled it off!  Thankfully her dad was also helpful in sanding, drilling the holes, and spray painting the lids although if you were to do this on your own, you could just use a nail and hammer to make the hole in the lid.  Also her dad was helpful in trimming the screws on the knobs, she picked up a lot of cute knobs at Hobby Lobby 50% off and the screws were really long.
Anyways, we had three stations set up so when the moms came in, they first went to the table with the knobs and picked out the knob they liked and then chose a station to create their jar.  The stations we had were candy, they could fill their jar with mints or taffy.  The next station was a beachy votive jar, filled 1/3 with sand (we bought a big bag of play sand) and then put a tea light candle in the middle and sprinkled in some small stones and sea shells (from the dollar store) around the votive.   The third station was to fill your jar with bath salt.  We had a tub of epsom salt and then set out the essential oils we had left over from the sugar scrub project we had done previously.  They added a few drops of essential oil to their salt and stirred.  Then they added a cute little scoop that she picked up at a party supply place meant for appetizers or something, but it worked really well in the jar with the bath salt.
This project was fun because there are so many ideas of what you can put in the jars...if you decorate a mason size jar or old spaghetti sauce jar, you could fill it with layered soup mix or cookie mix to give as a gift, smaller jars you can use for toothpicks, candy, teabags, sea shells, rocks, cotton balls, pencils (a great teacher gift) or whatever else you can think of!  


Friday, December 30, 2011

No One Likes a Frowny Face...

Lately our 4.5 year old has really been making an effort to perfect her unhappy mad face, just she she can express herself more clearly at any given opportunity.  It's been getting to be a little much and we were trying to explain to her that if she keeps making ugly faces, her face will stay that way and she will make ugly faces at people even when she doesn't mean to, and no one will see the kind, beautiful person she truly is.  So to help remind her, we told her she was going to have a warning first and then a time out anytime she makes one of those ugly faces.  Then I made this special mirror with her, I was planning to make it anyways just for fun, but decided to tell her it was for her to practice her nice faces.  So yesterday we put it together...

I picked up a purple feather boa and the hand mirror from the dollar store. The glitter is from the dollar store too...it came in her stocking.  we just hot glued the boa to the edges and also hot glued the edges of the mirror and added the glitter.  So far, seems to be helping...She's been proudly practicing :)


Saturday, December 24, 2011

Merry Christmas!

Merry Christmas everyone!  We had a WONDERFUL Christmas Eve with friends who had us over for a delicious dinner followed by a great Christmas Eve Service at church. Santa just finished his work for the night and now that he's gone I thought I'd share some of the Christmasy things we have had going on around here and with our friends.

Also, I am honored to have been a guest blogger over at Dear Creatives yesterday which you can check out here!  I shared a tutorial for making Giant 3-D Snowflakes! that we did with our friends.


 Finger paint Christmas Tree

 Hand print and Footprint Reindeer

Fingerpaint thumbprint reindeer with googley eyes
(thanks Kelsie for helping the girls!)

I'm a snowman!

Nativity

Mini Nativity Tree on our mantle

Christmas gift J made at Preschool for us

Teaching my 4 year old how to wrap presents and practice her writing

Magic Reindeer Food

Flannel stockings made by Gram, Snowman Christmas Counter Downer from My parents.

Christmas village my parents sent us this year, I always loved setting that up each year and I'm so excited my mom gave it to me.  


 Tyler reads them a christmas story every night this month

Made some festive dishtowels as gifts

Our other mantel in the kitchen, kids made the garland at a friends house and our christmas card collection has started

my 20 month old decorating Christmas trees with dot art

Feeling a bit festive, got some bows and bells in my hair! (thanks Whitney you wrap everything so cute!) Um, yes this has been my main outfit the past week while at home..good ol' college sweats never get old! :P

One of the Christmas headbands I've made 

Setting up the ol' train tracks with Dad! They used to be Grandpa's!

Christmas eve dinner with great friends, and "santa paws" made an appearance!  Well he's really Santa Bonz...we love you Bonzo Bean!!!

Caramel Popcorn drizzled with Ghiridelli Chocolate

One of our first Christmas tree ornaments that I made for our first Christmas 5 years ago when we couldn't afford to buy a bunch of new stuff.  


Wednesday, December 14, 2011

Christmas Clothespins

Holiday Clothespins Project


I recently posted the Holiday Clothespins Project by Blue Cricket Designs as one of the many handmade Christmas gift ideas.  We are making these as a craft project for my MOPS group and I was in charge of getting everything ready and making a sample for the girls.  So here are how some of mine turned out.  We have two MOPS groups that meet on opposite weeks and I heard the first group really like it and I'll be doing it with my group this week.  I hot glued magnetic strips onto the backs of all the clothespins so they could be used as fridge magnets but as she mentions in the original post you could include a ribbon for them to be strung along a mantle for displaying Christmas cards.  What a fun little project!!!


Wednesday, October 19, 2011

Glowing Rapunzel Hair Tutorial

Glowing Rapunzel Hair
Just like in Tangled!
"I have magic hair that glows when I sing!"


Rapunzel is one of our favorite movies...that's right "our"...I can't help but sit and watch it with my 4 year old!  Up until about a week ago, she planned on being snow white for Halloween, which I thought was great because she was snow white last year so we already had the costume.  Well, when she decided to be Rapunzel, I got kind of excited.  At first I wanted to get the Rapunzel costume and wig from Costume Express when I won their giveaway recently but they had already sold out for the season.  I found this rapunzel braid on Amazon Here for about $30

And then saw this awesome glowing Rapunzel hair party decoration on Etsy Here

And then knew exactly what to do for J's Rapunzel costume.  Make a glowing long Rapunzel braid that glows.  This was rather quick and easy to make and cost less then $5!

What you need
Battery powered short strand of mini lights
(found at hobby lobby for $1.99)
Purple ribbon
yellow yarn 
(more of a buttercream yellow and the thing of yarn is 355 yards, buy 2 packs if this is for a teenager or adult)
3 ponytail elastics
scissors

 Measuring
 Take the end of the yarn and measure around your child's head creating a crown and then let the yarn hang down to the floor, notice where the yarn touches the floor then add a bit more length for good luck, and snip.  This is your guide piece for measuring out all the strands of hair.   (or however long you want it)


 Making Sections of Hair

Lay the guide strand out across the floor nice and strait.  Then, hold then end of the yarn and just unroll it till it gets to the other end, then hold it down on the opposite end and loop it back the other way, working your way back and forth, until you get a nice thick row of hair.  I made each section of hair about the thickness of a quarter when you grab it.  So Once you get a row of thick hair, repeat that process 2 more times till you have 3 rows of thick long yarn (hair).  Remember you are just rolling the yarn back and forth, not cutting out individual strands
 Braiding it

Carefully bring all 3 sections side-by side.  Come down about 3 inches from the top and secure with a hair elastic or rubber band. Slip your purple ribbon in there with the elastic next to one of the sections of hair.  Start braiding the hair all the way down, Incorporating the ribbon as you go.  When you get a couple inches from the bottom, secure with another hair elastic or rubber band. 

OPTIONAL: If you want the lights to be in the hair permanently, then see the step below for where to put the battery pack, and then incorporate the strand of lights into the braid as you do the ribbon, being sure to keep the wires and lightbulbs from showing as best you can.  If you want to be able to take the lights off, continue below, leaving the lights for last.


 Model and Fit

Get your child and wrap the braid around their head like a crown and then secure in place with an elastic, making sure to tuck the loopy ends under the braided part so you don't see it.  Tie a piece of ribbon around the elastics at the top and bottom to hide them and make it pretty :)  I left the end of the braid as is, but you can trim the ends if you like.


 see the loopy ends on the underside of the braid where you connected it with elastic?

Make it GLOW

Lay your Rapunzel braid on the ground upside-down so the you are looking at the loopy ends that are hiding under the braid...Put 3 fingers through the loops and try to line up the loops of frabric as much as you can...mine weren't all perfectly even so I didn't get all of them, but enough to hold the battery pack.  Tuck the battery pack inside those loops.  Now, turn the switch to one and start spacing out your lights and tucking them into the braid to light it up.  Once you have all the lights placed in the corrects areas, you can either use strands of yarn to tie the lights in place which can be snipped for easy removal later or use some small hair claws/clips to secure the lights and wires in place.  

The reason you may want to make the lights removable and not incorporated into the braid is it is a little heavier with the battery pack and your little one may not always want to have that in there when playing, but for halloween and other special dress-up events, the lights just take this long Repunzel hair accessory to the next level of coolness while also making your kid more safe and visible on Halloween night!


This Repunzle braid is super fun without the lights too!

You can add fake flowers to the braid to make it more like the movie, I plan on doing that I just haven't picked up any yet.  I did have one that I stuck at the top of the braid as you can see... 


Let's see the battery lights were $1.99 and the yarn was $3.99 but I had a 40% off coupon so this fun repunzel braid cost less than $5 to make!


I picked up some fabric and plan to make an actual repunzel dress using the cinderella dress tutorial from make it and love it.  But if I don't end up having time at least she'll have this purple dress or maybe borrow a repunzel dress from a friend and make the handmade one for Christmas....HOPEFULLY I can get it done for Halloween though!


UPDATE!

While linking this up to parties I found this awesome RAPUNZLE DRESS TUTORIAL by Me Sew Crazy!  Can't wait to try it!

(and apparently there are already lots of braided yarn tutorials out there, I didn't realize!  Well, hopefully I inspired some new ideas by adding the battery powered lights :P)

I also saw this cute flynn ryder costume by crazy town welcomes you...I was thinking maybe my 18 mo little guy could be either Flynn Ryder or Pascal...