Showing posts with label before after. Show all posts

Tuesday, February 7, 2017

Painting the Outside Door


Well, our back door is technically a side door but it's the most used entrance to our house. Our house is brick but the side porch is all white look and I like the all white look, however between super alien green pollen and red dirt, nothing in Georgia stays very white for long around here!  This door was pretty beat up and needing a new coat of paint and for the past year I had envisioned a super dark navy blue almost black paint on it.  However when I got samples I ended up with like 50 shades of blue ranging from that super dark navy to light robins egg blue.  This color was in the mid-light range and an awesome friend who is much more decisive than me helped me narrow it down to a much more manageable decision.  Then I got my final opinion from my daughter and her buddy to decide between the final 2 paint colors.  This was not a time consuming project.  We did our homeschool in the morning and after lunch I started this project. The drying time takes the longest which was less than 2 hours and during that time I was doing laundry and playing with the kids.  Kind of instant gratification....that's my kind of DIY!

Here's a picture of the Opal Silk paint sample card with some of our eggs.

This color reminds me of my favorite blue-green eggs that my Easter egg layers leave me in their nest.  It's called Opal Silk by BEHR.  I bought a quart of exterior satin enamel (I didn't want a shiny glossy door) in the BEHR Primium Plus ULTRA Stain-Blocking Paint & Primer in One. Along with a small paint tray, small roller and 1 1/2 inch brush.

BEFORE:

This is after already going over it with an electric palm sander to smooth out and remove and marks, it cleaned the door pretty good.  I didn't sand in the molding, just whatever I could get with the palm sander.  Then I panicked and though maybe I should leave the door white after wanting to paint it for over a year...but I decided to ignore the self-doubt and hurry up and do it! 😅


I pinned up plastic to keep the door clean while working but I ended up taking it down because my cats were driving me nuts pouncing on it and making it fall down.  It's still winter, but we had a warm day in the 60s and I didn't have to worry about bugs landing on the wet paint so I ended up tearing the plastic down before even getting to painting.  But it's a good idea if bugs are out to keep your paint job from getting messed up. I placed a piece of cardboard under the door to work on and keep my hardwood floors clean.

I removed the handle and deadbolt and taped around the glass window frames, I didn't have painters tape and just used white masking tape.

I think I was supposed to remove hardware before sanding but it didn't really matter.  Just make sure to really wipe down the door nice and good to remove any dust before painting.

I looked up on Lowes how to paint a front door and it's pretty straightforward and did not take long. Less than an hour and I only painted the exterior face of the door.  I figured if I liked it I could later paint the entire door if I wanted to have that cute color on the inside as well. https://www.lowes.com/projects/paint-stain-and-wallpaper/paint-wooden-front-door/project


First stirred the paint and poured into my small paint tray. Starting with my paint brush, I painted the small wooden cross sections that separate the 4 window panes and the inside trim around that area.

Then using paintbrush, painted the mounding on the bottom half of the door.  (Photos taken after)


Using the small paint roller, I then applied paint over the 2 front panels that are part of the mounding on the bottom half, then before it dried, lightly dragged my paintbrush down virtically following the natural grain of the wood to leave natural paint brush marks.  


Bottom of door you can see the wood grain/paint is vertical in middle and then cut off by a seam created when you go across horizontally on the bottom of door.

Next, use the paint roller across the middle section of the door and then did the same thing, lightly pulled the paint brush across to smooth and leave the lines going horizontally following the grain of the wood. And repeated that method along the very top of the door above the window.

You can see the paint brush marks creating the grain after using the paint roller. This is along the long outside sections of the door that go top to bottom.

Last I used the paint roller down both sides of the door from top to bottom and then again, went over with the paintbrush leaving vertical lines following the grain of the wood from top to bottom.  I didn't end up taping the sides of the door with tape because with the paint roller it went on so clean and did not wrap around the edges at all.  Just be careful when going over with the paintbrush to not flick the sides, but if you do, you can quickly wipe any unwanted paint off with a damp rag. 
See how I did not paint the outside edges of the door.

I got some paint on that little piece of weather stripping on the bottom so I just painted the whole thing...looks better anyways because it was stained the Georgia red clay color and looked dirty once I actually noticed it.


I let it dry for 1-2 hours with door left open and then applied a second coat, repeating the steps above which did not take long, 45 minutes at most. The paint was dry within 1-2 hours and I just left the door open the rest of the day even though it was dry before shutting it.

I carefully removed the tape on the Windows, peeling it off pulling at an angle towards the inside of the window.  If you pull the tape off without cautions sometimes if the paint is still a little soft, it can pull of the paint around the edges of the tape.  There were a few spots of paint that got on the window but I just quickly scratched it off with my fingernail.

  It's been a few days now and still looks great :). I went to Charleston with my daughter for the weekend for a gymnastics meet and the hubby text me saying how good the door looks and that I should paint the door on our screen porch that color and our basement doors too! I'm not sure if I'll do that or just leave it to this one cheerful pop of color but we'll see. 


Sunny afternoon

Rainy afternoon

I painted this the day before going to Charleston and with this color on my mind, I was loving this house on rainbow row that I had to snap a picture of.  Maybe I will paint this someday!  Blue green turquoise love going on!!!!


Thursday, January 15, 2015

Cheap DIY White and Turquoise Desk and Chair Makeover

Cheap White Desk and Chair

Turquoise 

DIY

Makeover

Chevron

Pottery Barn Style

Girls Room....
you ready for this?


For Christmas this year, my 7.5 year old daughter badly wanted a desk for her room more than anything.  She's starting to feel like a big girl, growing out of the princess phase and coming into a creative big girl phase where she wants a place to sit down and write, read, be creative and she needed lots of drawers to keep all her papers, note cards, and arts and craft supplies organized.  So...although she's grown out of princesses and realized the princesses at Disney are just pretending...she hasn't grown out of Santa quite yet so she asked Santa for a white desk and chair.  

I was more than happy about this request as it made it excited about reading and writing which was our biggest battle all last year...working on reading and writing.  So if she had a place that made her inspired to do those things on her own...I was all for it.  Then I started shopping for a white desk with drawers and a wooden chair to match...um....wow...Santa wasn't planning on spending $400 on one person.  So I started searching craigslist and a thrift store that is near our house regularly.  Even on craigslist, white wooden children's desks are not cheap!  I really didn't want to spend more than $100 and in my search, for like $80-100 I could get a really cheap white desk at Ikea, Target or Walmart but with no drawers...just simple white legs and top...NOT what I was looking for.  So I stayed patient and just kept looking.

One day I dropped her off at gymnastics and then popped into the thrift store and there it was...a dingy white wooden desk with lots of drawers and a wooden chair.  The paint looked nasty...like it was yellowish and a really bad paint job and the chair had really ugly flowers painted on it...but I was SO happy!  I was ready to strip and primer vintage wooden desks I had seen on craigslist that were more that this one and this one needed a lot less work since it was already white-ish.  So for $40 I got a cheap white wooden desk and chair with 7 drawers.  So I got a small can of semi'gloss white paint and home depot and the next week knobs and drawer pulls were 50% off at hobby lobby.  I found these pretty turquoise "glass" knobs and this awesome turquoise chevron drawer liner paper that was also 50% off and I was all set to go!  

My inlaws came for Christmas so while Grammie and Grampa enjoyed the kids, I was able to sneak downstairs to "Santa's Workshop" and in no time had this baby sanded, painted and put back together.  My only hiccup was I was so excited to use the power sander for the first time.  We found it in the basement when we moved in.  I started and it was AMAZING!!!!!.....for about 1 minute and then the foam pad that holds the sanding paper to the sander started to disintegrate and foam started flying everywhere.  So I had to sad the rest by hand....which wasn't a huge deal but getting the chair smooth where those ugly thickly painted flowers were took some elbow grease!  

The paint dried fast so I would paint a coat on everything, come upstairs and be with the family...then run down later and do another quick coat...it really wasn't as big a job as I thought it would be.  

So without further ado....here is the cheap DIY white and turquoise desk and chair makeover!  My daughter LOVES it and was so excited it had lost of drawers, and was even more excited when she opened the drawers and saw the pop of color inside with the turquoise chevron drawer liners.  I love it too!  

Christmas Morning!


 side note: My son got what he wanted too, a punching bag like at karate - another thrifty find....Santa got that on craigslist!  lol!  You can't tell though, someone had bought it for their kid who did karate but who didn't use it that much...plus...really...how much wear and tear is a kid going to put on a punching bag practicing their kicks and punches...they aren't that strong! lol!)  When I picked it up from the family, the mom was laughing at me and said I was hilarious I had the kids in the car and put a black garbage bag around it and told the kids we were picking up some spare tires for daddy's car. lol!  I think she also thought it was funny that I was getting a christmas gift on craigslist but seriously...he's 4.5...I don't know how long he'll like karate for...why buy a brand new one just for the sake of having it be new when this one looks brand new anyway?

 
(hubby hadn't trimmed the end of the knobs yet because we were pretty tired Christmas eve when everything was wrapped up but it's a simple thing to do)


It really pays to be thrify and put in a little elbow grease!  Even if you can afford to buy the $400+ desk from pottery barn,to me it's more fun in the end to have gone on a treasure hunt, found the right thing and then made it pretty again...I enjoy it more, plus kids stuff rarely stays nice forever anyways so when it does get dinged up, at least I have the matching paint for touch ups!  

Here is the before & after shot...I was so excited to get started I didn't remember to take a real "before" shot before getting started.  I took a these with my iphone 3 which has a horrible camera and the lack of quality actually makes the desk and chair look better than they were! lol!
The drawers also had different colored knobs with big screws in the middle....not too cute.  The sides of the desk were a mix of not full coverage white and yellowed paint with drips.


Friday, August 8, 2014

Deck Makeover

So after the chicken coop project got finished, next up was the deck.  It was a pretty big project with the power washing and painting, more than you might think.  I did help with some of the painting but who am I kidding, Hubby did most of it...he finished the work while the kids and I were away visiting family so it was nice to come home to a finished project!  Not to mention he cleared out a bunch of the ugly tree stumps in the yard and thoroughly cleaned out the mini van! thanks babe!

Anyways, I'm loving the new deck, it feels so much cleaner with the fresh paint and stain vs the weathered wood that was stained green from the spring pollen with curling boards...hubs got that all fixed up now.  At first we were going to just stain the deck all one color with either a clear stain or something subtle but then the deck had these copper caps on the posts and they weren't that noticeable against the weathered wood and if we did a brown stain all over I didn't think it would do much justice so I went hmmmmmm.....for about an hour as hubby tapped his foot waiting for me to decide so he could go to Home Depot to get supplies and decided to go ahead and paint the deck rails an off white and then do Thompson Waterseal stain in Acorn Brown I think it was the semi-transparent.

Here's the before and after.


at first we were thinkinf just doing a clear coat sealer to protect it but keep the natural wood look but I made a quick decision (not something I normally do!) and went with it...We both like how it turned out


Next phase? This last picture reminds me we should probably get around to adding some deck skirting so we aren't looking under at our crap we store underneath, but at the end of the day...it's just one of those things that ain't the most important in the world so for now I'm just going to enjoy a finished project and having the chicken coop and deck getting protected off the Hubby's project list and just hang out!  Those were 2 projects that seemed unfinished for a long time, not because of him, just because they take a lot of time and he just does what he can when time permits.

Thursday, August 2, 2012

Chalkboard Pedestal Table Makeover

Chalkboard Pedestal Table Makeover


So about 2 weeks ago I was driving to the dollar store and as I drove past the thrift store in the same strip mall, they had this octagon pedestal table out on the sidewalk.  I decided we hadn't looked there in a while so we stopped and I walked up to the pedestal table and saw that it was marked down from $10 to FREE.  Suddenly I hear Jordan squealing because she found a princess scooter parked out front too and has been wanting one for a long time.  It was a whopping $2.98.  So we got the princess scooter and I heaved that pedestal table quickly into the trunk of the minivan (yes I love having a minivan now...never say never!!!)  I didn't look at it more than a few seconds, long enough to see it was free and so I just grabbed it, we were in a hurry.  Later, I realized the table was pretty gross looking, but kept it in the back of the van for the rest of the week (I couldn't get it out myself this thing is SOLID and HEAVY!)


When My husband finally saw it, he was like what in the world!?!? Why is my wife driving around with this nasty disgusting table in the back of her van all week?  We were all together in the van that weekend and I didn't know what to do with it and we are already busy trying to sell our house...so I said "fine lets just drop it back off at the curb on the way home...but when we got close...I couldn't do it and said "give me a week to figure out what to do with it and if I don't know we'll dump it back off".


When I FINALLY took the pedestal table out of the minivan, I knew even LESS what to do with it at first...I had originally thought it could go in the dining room with a vase of flowers since we have no table and it's pretty empty, I was thinking to paint it with the dark espresso paint we used on the cabinetry in the bathroom.  But once I stood next to this octagonal pedestal table, I realized it was not only disgusting and filthy, it was a really weird height...too tall for a coffee table...too short for any adult to sit at.  I also realized the top swivels around.  What in the world was this table EVER used for?  I thought okay, well I have to take it back, no wonder it was free....it's the weirdest table ever!  And went inside.

Let's spin it around to a new spot

Later, when I was in the garage with my daughter riding her scooter, I realized the table was a great height for kids and decided to keep it and make it into a fun activity table.  I've been wanting to try a chalkboard paint project for a long time so this was my chance.  A gave the table a good soapy wash down and lightly sanded the table top but not the base.  I let my daughter pick out the spray paint for the base of the pedestal table ( After I told her no pink or purple...)  I even let her help roll the chalkboard paint on the top!  It was a pretty simple project, did a quick coat of spray primer BIN 123 (i think it's called) all over.  Then spray painted the base turquoise which took no time at all.  And got a good enough covering in 1 coat with 1 can.  The next day I taped around the edges of the table top and we just rolled on our Rustoleum Chalkboard Paint and repeated 2-3 times throughout the day...but each coat only took 5 minutes to roll on with a foam roller.  So, I'd say the most effort put into this free pedestal table was getting the heavy ol' thing into the back of my car MYSELF!  I noticed people driving by slowly, watching me struggle probably either laughing or contemplating helping me before I broke my back but I managed.


The kids L-O-V-E their new pedestal chalkboard table!  We put it in the den in our basement so the lighting isn't great in the pictures but it's a good spot for it.  The kids love drawing in one spot, then spinning the top around to get to a fresh spot and then wiping it down with rags when they want to start fresh.  I put some sidewalk chalk in these cute little metal buckets I had picked up at the $1 section at Target for them to use.


J was drawing Caillou and his family for B...he kept asking someone to draw Caillou...Rosie, Cat...Caillou mommy and Caillou Daddy and J was more than happy to meet his request.


Tuesday, July 17, 2012

Cheap Easy Light Fixture Updates And Bathroom redo 2.0

Cheap Easy
Light Fixture Update
Photobucket

So The bathroom makeover I did wasn't quite finished when I posted the reveal....since then I painted the cabinet and the trim dark brown using Behr French Roast and it looked great.  I also used that Satin Acrylic Latex Enamel from the Fireplace Update and painted it on the gold hinges with my daughters small watercolor brush...so I wouldn't have to take the hinges off and repaint them!  and I FINALLY updated to gold light fixture...we were planning on buying a new light fixture we liked....only all the ones we liked were more than we wanted to pay so we hadn't done anything....until now...of course that we are selling the house...getting everything finished and polished for someone else to enjoy :(


bought oil rubbed bronze spray paint and just took the ugly gold fixture outside and gave it a spray and had the hubby put it back up.  We also spray painted the ugly gold fixture in the basement bathroom too and it's such a small, cheap thing to do but yet is a major improvement. The spray paint was $7 and I updated two light fixtures with it with more to spare...basic bathroom light fixtures start around $50 so this is definitely the best way to go unless you just feel like splurging on a light fixture...

Here is the basement light
Photobucket

And Here is the the final picture of the bathroom makeover that I never showed you with the cabinet and baseboards painted French Roast and the hinges painted black.

Photobucket


Friday, August 26, 2011

Doll Bed Before After

Doll Bed 
Before & After

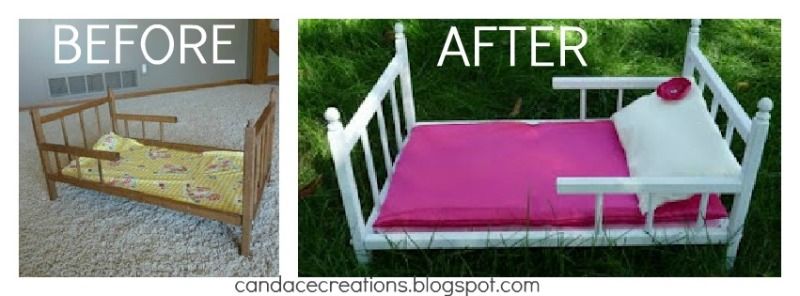
Earlier this summer I picked up this little doll bed at a yard sale for 25 cents...


It must have been the lower part of a doll bunk bed because it just had those little dowel pieces sticking up on the end of each post...it also had that old yellow vinyl glued to a board for the mattress.

I found these Dowel toppers at hobby lobby for like $1.27 for a pack of 4 and stuck them on the tip of each post...but there was still a bit of a gap so I filled it in with caulking that my husband had left on the work bench from doing the windows.

Then I lightly sanded the doll bed, removed the vinyl and spray painted the bed white (MY FIRST SPRAY PAINT JOB!) and painted the mattress board light pink.


(Yeah I know the grass is too long, we need to buy a new lawn mower!)

 
I made the pillow with the fabric that WAS the lining of the curtains I used on the crib bumper pad (the shinyish slate blue fabric was a curtain panel on clearance and was just the fabric I had wanted!) The pink fabric was also just sitting in my stash.  I learned about these sweet little circle flowers with the burnt edges from Crystal over @ Wanna Be Balanced, they are really simple and I plan on making a lot more of these in the future!