Friday, October 29, 2010

100 Followers Giveaway!

I just noticed today that I have 100 followers!  Exciting!  And what better excuse to celebrate and have a GIVEAWAY!  My Giveaway is for custom 8x10 fine art portrait using a picture of your choice! 


To Enter this giveaway, just leave a comment!

For additional entries  (leave a separate comment for each)
Follow on GFC  1 bonus entry
Follow on Facebook Networks Blogs  1 bonus giveaway
Vote for me on Top Mommy Blogs  1 bonus entry each time (you can vote everyday)
Blog about this giveaway    3 bonus entries
Twitter this giveaway   1 bonus entry
Put my button on your blog  3 bonus entries  (and let me know where I can find it in your comment)
Post/link to this giveaway on Facebook  1 bonus entry

The winner will be selected next friday, Nov 5!  I will contact the winner and you can email a photograph of the what you would like turned into an artistic portrait.

GOOD LUCK!


Thursday, October 28, 2010

Fall Family Portraits


We recently had our family portraits taken by our wonderful photographer, Tessa MacLeod.  She is so fun to work with and really great with the kids.  B is 6 months already and so we had to document and do a portrait session.  These are our first real family portraits with the little guy.
Tessa has been specializing in Newborn, Lifestyle portraiture, Seniors and Weddings for over 8-years. It is Tessa's passion to capture the most passionate moments of your life and tell your story.

"Life is not measured by the breaths we take,
But by the moments that take our breath away."

Tessa's first experiences with a camera came at 4 years old when she used all of the film in the camera on her first plane ride. Tessa retained her passion for photography and flying and now does both as often as possible. Tessa founded Tessa MacLeod Photography 4 years ago and is the artist behind the camera. Tessa's journey to becoming a photographer started at the age of fifteen when she purchased her first camera at a yard sale. Her passion was ignited and, along with her gift of natural artistry, drove Tessa to her dream of making a living by capturing natural images and lifestyle photography for her clients. Tessa's favorite part of being a photographer is that through the filter of the cameras lens, the world is a very different place where beauty and uniqueness are easily found in everyday moments.

Let Tessa tell your story through her lens. 

Here is one of my favorites from his 3 month shoot that Tessa took...gotta love those bare baby bottoms!

 And the Adorable knit hat and tie onsie is from WE CHOOSE JOY on Etsy...She was SO great about getting my order done quickly in time for the pictures and I love how the outfit looked on him.
 

Wednesday, October 27, 2010

Pumpkin Spice Cupcakes with Cream Cheese Frosting

Pumpkin Spice Cupcakes with Cream Cheese Frosting
 Looking for the perfect yummy fall treat to bake up for the Halloween carnival cake walk or just a scrumptious treat to have waiting on the table when your kids/hubby come home? Well, if you have been craving pumpkin spice lately, you have GOT to try these!  I got the recipe when I attended Parties that Cook last fall when I was in San Fransisco with my good friends at eHow.  Anyways, I love these and so does my family....too bad I don't get to eat the YUMMY cream cheese buttercream frosting this time around...now that I'm dairy free! (it's soooo hard sometimes!!!! but not worth having a fussy baby for the next 48 hours)


Cupcakes:
2 cups granulated sugar
1 1/4 cups canola oil
1 15oz can of pumpkin
4 eggs
2 cups all-purpose flour
1 ½ teaspoons baking soda
1 ½ teaspoons baking powder
2 ½ teaspoons cinnamon
½ teaspoon ground ginger
¼ teaspoon allspice
1 ¼ teaspoons kosher salt

Cream Cheese Buttercream Frosting:
1 stick butter
1 8 oz. package of cream cheese
3 1/2 cups powdered sugar
2 teaspoons vanilla
½ teaspoon kosher salt
Preheat oven to 350°F: Position rack in the center of the oven.
Cake Batter: Cream together granulated sugar, oil, pumpkin and eggs until well mixed, about 2 minutes.  In a bowl, sift together flour, baking soda and powder, cinnamon, ginger, allspice, and salt.  Add to the wet ingredients and mix until combined and smooth, about 30 seconds (but don’t over mix).

Bake: Line muffin tins with cupcake liners.  Pour batter into the cupcake liners and bake for 15-20 minutes (or you can make it into a cake by pouring the batter into a greased 10x13 pan and baking for 35-45 minutes).  Cool completely on a cooling rack.

Buttercream: Beat butter and cream cheese on high speed for 2 minutes. Add sugar, vanilla and salt.  Mix until smooth. Frost each cupcake generously with frosting.  Serve.


Tuesday, October 26, 2010

Carving Pumpkins

Carving pumpkins is not really my favorite thing to do.  I agree only to do it if my husband cuts the top and cleans them out and since Halloween is like his favorite holiday he's all about it.  So this weekend we carved pumpkins while playing the movie "Pumpkin Head" in the background to get in the Halloweeny spirit (I also do not enjoy those types of movies...the things we'll do for those we love!!! lol).  We are kind of limited to our pumpkin carving abilities especially because we're too cheap to buy any of those pumpkin carving tools and just use our dull steak knifes.  So here's our pumpkins...no we are not original, we copied our pumpkin carving ideas from google images of other jack-o-lanterns, and I was too lazy to really clean up my pumpkin once finished to make it any better.  My pumpkin is the first one and my husband did the skull one below.  For me, the most exciting part is I didn't slice myself...I had a few close calls!

HAPPY HALLOWEEN!


Candace Creations

Monday, October 25, 2010

My Shoe Dazzle Picks

My sister is a fashionista.  She is always put together and ALWAYS completes every outfit with a fabulous pair of shoes.  Which is why I wasn't surprised at all when she told me about this "shoe of the month" club like program she had signed up with.  Shoe Dazzle is a great service.  For one low price, you have a personal shoe shopper send you selections each month based on information you give them about what you like.  Should you choose not to get any of the selections, no big deal, you just skip the month and see if you like any the next month.  You are not forced to buy something every month, although you CAN!
Here are my favorites from my shoe show room this month!  Which do you like best?  Check out Shoe Dazzle now, and get 20% off your first item!  Co-founded by chief fashion stylist Kim Kardashian, you are bound to find your next favorite pair of shoes!  I'm obsessed with my latest pair, a turquoise snake skin peep toe high heel....they are so RAD!

Tuesday, October 19, 2010

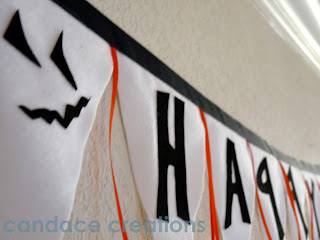
Halloween Banner Tutorial


No Sew Halloween Banner Tutorial

supplies
1 sheet stick back black felt
1/2 yard white fabric (I used flannel)
1 inch wide black ribbon
1/8 inch wide orange ribbon
scissors
glue gun
Cutting board & Rotary Cutter (optional-makes it easier!)

1.  Trace or free hand the letters to spell out HAPPY HALLOWEEN on the back of your sticky black felt BACKWARDS.
Don't make the same mistake I did and end up with backwards letters (see how the P's turned out?!).  I realized I needed to reverse the rest of my letters in time to fix the rest, I just cut them opposite than what I had originally drawn.  I could have gone back to the store and got more felt to fix the P's...but I'm notorious for making mistakes like that so I figured I'd just leave it that way...it's almost a tradition, I always mess up something simple!
Since you need to cut the letters in reverse so they are facing the right way when you stick them on the Halloween banner, it might be easier to draw a template or print a template, cut out the letters, then place them on the back of the felt BACKWARDS and trace them so it looks like the above picture.  My letters are just about 3 inches tall.

2.  Cut Letters out and set them aside.
3.  Cut out 16 Triangles.   
I made my triangles 5 inches wide across the top and 7 inches long.    
As you can see in the pics below, I stacked up my fabric 4 layers thick while cutting to speed up the process, that's where the rotary cutter and board come in handy, but you can always cut these out with scissors.


Peel off paper backing on felt letters and apply them to the triangles.  
I cut out shapes for the jack-o-lantern faces from some of the scraps.

Cut the orange ribbon into thirty 9 inch long strips.

Using a glue gun, start gluing the triangles to the black ribbon starting with the end 
(so you start with a pumpkin face, then N-E-E-W-O-L-L-A-H-Y-P-P-A-H-and then last pumpkin face.)  Also be sure to leave 10-20 inches of ribbon on each end for hanging)  Glue two strands of orange ribbon between each triangle.


Hang up your Halloween Banner!


A Crafty Soiree


Friday, October 8, 2010

Read for the Record


Yesterday was Read for the Record day and we happened to already have a copy of The Snowy Day, so we pulled it out and helped set the record of most people to read the same book on the same day.  Read for the Record is a campaign put on by Jumpstart to help raise awareness of the early literary crisis and raise funds for Jumpstart's yearlong early education program.  If you participated in Read for the Record, make sure to make it official by visiting the Jumpstart website and registering to be counted.

Thursday, October 7, 2010

The Perfect First Food

Well, the little guy is 6 months now! Can you believe it?  The time has gone by so fast!  And the day this little guy has been waiting for finally came....his first solid foods!  Our pediatrician told us that Avocado's are the perfect first food for baby, so that is what he got...his first food (not counting the sugar crumb topping from banana bread my daughter snuck him..oh and the piece of chocolate chip muffin when he was like 4 months).
 Big sister was so excited to feed him!
 He was excited to eat...but not liking his sister doing it so much....

 We're introducing foods opposite the way we did with our first.  Our ped says avocado first, then all the green veggies, then the orange veggies and so on...then cereal is last!

Wednesday, October 6, 2010

Cheap Easy Halloween Crafts

Check out these easy Halloween crafts!
I'll admit it, I want to be festive and decorate for Halloween, but I hate spending a bunch of money on stuff that will be in storage most of the year (and storage space is a precious commodity for us apartment dwellers!) so my husband and I have been reminiscing our elementary school years, making decorations with paper, scissors and glue/tape....mostly.  It's been fun making a few things with what we have lying and that our daughter can enjoy.  It's been a family project...well, ongoing because we plan on making more stuff throughout the month.

My 3 year old and I whipped up this easy hanging ghost decoration.  We used a wire shirt hanger, plastic bags, white garbage bags, elastic band and string...and a sharpie.

Another ghost, this one is small made with some waxy tissue paper and plastic bags in the head.

We used this How to make paper spider web video and found a spider picture and free handed it onto our black paper to cut out.  For any silhouettes just Google image search and try drawing it or print it out and trace it to make some easy halloween crafts.
create a halloween lantern with paper sillouettes and a lamp shade!

Started this scene on the wall, hope to ad to it! We are currently out of black construction paper now!

Fun Easy Halloween Crafts!

Don't forget to link up all  your fall crafts and decor projects HERE!