Friday, April 17, 2015

Charlotte Mason Nature Notebook


One of the things I really wanted to focus on this year was keeping nature notebooks and we have a little bit but not very much.  But it's hard to get the kids excited about it just by telling them "wow look at that red cardinal! Now go draw it in your notebook!" But the best way to get them excited about doing things is to set an example and do it myself. so part of making myself start a nature notebook was volunteering to lead the sketching portion of our Charlotte Mason Nature Club since a lot of the kids were bringing their sketch pads but no one was really sketching.  So I picked up my own fresh sketch pad and just that act alone was very exciting! Lol!  


I drew up 2 samples for the upcoming nature outing as we will be focusing on birds and I chose to draw a blue jay and cardinal because I have been enjoying watching those 2 birds in our yard lately.

Anyways I'm excited to get the kids excited about their nature notebooks and   Hopefully next week I can post a couple pictures of what the kids do if they let me!


Update:

I taught the kids the secret to drawing any bird is to start with an egg shape for the body and a circle for the head...and while studying the bird they can take into account the proportions and positions of head and body.  Then you add a curves line to connect the top if head to back and bottom if head to breast, add an eye. And pretty much straight out from the eye is a straight line for the middle of the beak.  Look at the bird, does it have a very short beak or a long beak like a hummingbird? Then you can draw an angled line from the tip of the beak back to the head on top and bottom. Then you add wings and a tail...again look at the bird, a cardinal has a longer almost rectangle tail, a blue jay tail is long but more full and rounded at the end, other birds have a very short tail.  After putting in the basic shapes and proportions you can render the details, make edges more soft and curved with feather shapes and erase you drawing lines that are no longer needed at the end and add color.  


The point of a nature journal is to have fun recording what you observed in nature and also experiment and have fun with as an art journal as well.  I always tell my kids to have fun with it, if they want it realistic they can but it doesn't have to be an exact representation of what they see.  Just enjoy nature, think about it and use it as inspiration in their nature notebooks/art journal.

Here are some other things my kids have done in their nature notebooks for example


Fall foliage

 Tracing a leaf

Watercolor sheep

Watercolor wild horse on beach (from Cumberland island)


Recording his playtime with the hose outside


A blue jay


Collecting chicken eggs 

???? Lol

Monday, April 13, 2015

3 Tier Ombré Turquoise Gluten Free Dairy Free Strawberry Cake with Whipped Coconut Filling and Buttercream


Yes it's a mouthful!  It's a gluten free dairy free strawberry cake with whipped coconut cream and strawberry filling and buttercream frosting!  And it was soooooo yummy!  I think all the moms had seconds!

This was for my daughters birthday party.  A garden theme party!

The gluten free strawberry cake recipe is from the cookbook Cooking For Isaiah by Silvania Nardone.  (Great book)

I doubled her strawberry cupcake recipe and split between 2 regular size round cake pans, a small/medium corningware dish and a small Wilton cake pan.  I improvise to make different size layers :)

For the strawberry whipped coconut cream filling I put a can of Thai kitchen coconut milk in the back of the fridge overnight and when ready to use, scoop out the cream as it seperates from the water.  Whip it in the electric mixer and add a tiny bit of powdered sugar and about a tablespoon of strawberry jam.  Put back in fridge until ready to assemble the cake.  The 2 regular size round cakes were the bottom and I spread the whipped coconut cream between the layers.  Then using a bread knife, sliced the other 2 cakes in half to put the whipped coconut filling between those layers.  

For the frosting I user the regular buttercream recipe on the powdered sugar bag although I substitute butter with Spectrum Organic palm shortening and Earth Balance Vegan Butter (you can do all shortening though) and use almond milk.  
I applied frosting between the different tiers to secure the cake and applied a thin crumb coat...then skipped the whole freezing thing...went straight to piping on icing.  I added a drop or two of Wilton gel pastel blue food coloring for a very soft color and then just piped on with a frosting bag.  I didn't use a tip, I just snipped the corner of the bag and started piping it on.  Each time the bag ran out of frosting, I added a drop or 2 more of Wilton turquoise food coloring and continued piping frosting around the cake, basically just squeezing the bag and rotating the cake stand to get it around.  I'm not a cake decorator, so I have no special techniques or anything...but I had fun kinda slightly changing the way the frosting piped on as it went on, working from the top and spiraling down.  

At then end, with the left over dark turquoise frosting I piped a heart on top and my daughter placed little paper flowers we found in a $0.50 bin at micheals.  

This cake was one if the yummiest cakes I've ever had!  I wasn't sure about the strawberry whipped coconut cream but it was a good experiment!  I was originally just going to out strawberry jelly between layers and then the idea to mix it with coconut cream came to kind and I live how it turned out!  

We try to avoid food dyes for the most part, but sometimes it's nice to make exceptions and have a pretty turquoise cake :)

The best part us when you make something gluten free and dairy free and everyone loves it...not because it's "good for being gluten free and dairy free" but because it us just freaking good!!!  I love this strawberry cupcake/cake recipe from Silvania Nardone and I would love to post it but it's not mine and besides, her book is good anyways!  


DIY Cinderblock and Paver Stone Bench

I


So I was getting tired of the spot where our driveway just stops and drops off into the woods, it's bushy and not fun to have to climb through there to fetch all the kids stuff that rolls off the edge and down into the woods.  I put up the 2 flower pots we had in the basement from the previous owner and planted hydrangeas...it was looking better but wasn't solving the problem. I realized it would be a great spot for a bench, it gives a great view of the front yard and back yard for watching the kids and hanging out.  


We have a pile of bricks and cinderblocks in the woods off the side of the driveway that were left over from when the house was built so I thought maybe I could try building something with the cinderblocks and hope it wasn't ugly! I always get excited about being able to make use of stuff that's already lying around!  I brought the cibderblocks over 1 by 1, and lined them up the edge of the driveway and my 5 year old son helped top it with paver stones we found in various areas on the property lying around.  


Add some Dollar Tree Solar lights and black wire Decor in the flower pots and we are loving the difference this cinderblock bench wall makes.  It's inviting when you walk out the back door rather than walking out and seeing tricycles, scooters and balls mixed in among the brush.  


It's been great!  We finished this pretty quickly to surprise daddy when he got home.  The kids have taken their lunch out their everyday to sit and eat there, watching the birds and hanging out.  They also love to hang out on the cinderblock bench wall after dinner to sit, do balance beam routines, jump off repeatedly or play their ukuleles.  

Yay for free cheap easy DIY fixes!!!!  

The next day I put together my first wood working project an obelisk ...simple I know, but I am proud of it all the same! Lol!  It cost less than $5 to make, all I bought were 5 lengths if these thin planks of wood for less than a dollar each and then used screws and spray paint I found in the basement.  I put the obelisk near the new cinderblock wall bench and planted some sweet peas on 2 corners of it, I plan on planting some honey suckle or climbing rose bush at some point though.  


The area still needs a some work...maybe a couple more boxwoods or space out the ones I planted last year a little more.....

Last year the whole end of this driveway and the hills sloping down from it were overgrown messes of brush and red dirt...that little path with the pot at the end just went into the thick overgrowth, but I added the planter (another find in the basement) and planter a Lavendar plant......LOVE Lavendar!!!!!

To the right of this photo there is a hill sloping down... It was all giant weeds but last year I landscaped it into a berry patch with blueberries, blackberries and raspberries.... However last year our chickens ate all the berries before we could so this year I need to strategize!

Behind the obelisk and going down the slope on the un-landscaped portion are wild blackberries....yeah my husband had a good laugh when after I planted blackberries we soon noticed the wild ones growing right there!  

Anyways...this spring has been exciting so far as we are finally settled and my hubby spent all last year cutting down trees and brush pushing back the woods and opening and cleaning things up....now we get to have fun with that space!  I am really REALLY loving having stuff to do outside.  It's so refreshing and satisfying and exciting to see things start growing and putting our own little stamp on the place here and there, making our home more our own.  I used to think I had a black thumb and would never   garden like my mom and I may never garden to her degree of amazingness...but I'm finding out that I am enjoying landscaping and gardening all the same!  Little by little....

Saturday, April 11, 2015

Restoration Hardware Teepee Knockoff


Back in the fall I saw a picture of this amazing teepee from Restoration Hardware and fell in LOVE!  I had just built a stick teepee outside for the kids as we were having fun study early American history and acting out being pioneers and Native Americans in their playtime.  And then I saw this Teepee and it was just so whimsical to me!  So I picked up brown and white chevron fabric at Hobby Lobby 40% off and got home and set out to work figuring out how to cut the fabric and out it together.  We had new kittens and I just ended up stashing the bag with my sketch and measurements in a bag in the closet.  I had also gone out in the woods with a big pair of loppers and cut down some trees that were pretty straight and no more than 1.5 - 2 inches round for poles. Then it all just sat...and sat....but last week was the week!  My son has his first ever birthday party to celebrate turning 5 and it was Native American themed and that spurred me on to finish the teepee!

I had looked online but didn't find a tutorial that I liked because all the tutorials used some sort of large sheet, drop cloth or super wide fabric so the measurements and pattern didn't work for my 45 inch wide patterned hobby lobby fabric.  

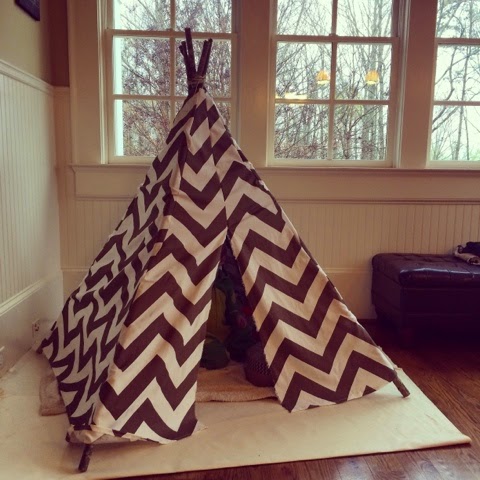
So here is my tutorial for a DIY Restoration Hardware Teepee / Pottery Barn Teepee for less than $30. I bought more fabric than I needed Bc I didn't know how much I needed until I made it so I'll save you that!

Supplies
3.5 (or 4 just to be safe) yards heavy weight fabric (duck/canvas) hobby lobby has lots if fun prints around $9.99 and you can use the hobby lobby app on your phone to get it 40% off! For 4 yards that's $24.

Thread
Ribbon
4 poles either cut trees or PVC pipe ~70 inches long
Measuring tape
Pencil
Long straight edge like a board or yard stick
Sewing machine

Lay out fabric, folded in half lengthwise.

Measure 62 inches up and mark fabric with a pencil.  Use a clear quilting ruler to cut straight across at that 62 inch mark. 

From folded edge, lay out your long straight edge to get a straight line from corner to corner.  (I used the board we had just used as a cross for an Easter lesson). 

 Draw along that straight edge with a pencil.  


Then carefully cut along your pencil line


You will have this... When you open it you have one large traingle and two halves of another triangle.  

Repeat that process again with the remainder if your fabric.

Now you should have 2 large triangles and 4 half triangles.  Take one of the half triangle pairs and flip the fabric so the right sides are facing eachother and everything is lined up and then along the straight edge (not the angled edge) stitch the two pieces together creating a full triangle when it's opened.  


Repeat that process with the other half triangle pieces except this one will be the front of teepee with a door so start sewing from the top of the triangle and see down the the edge about 24 inches and then back stitch to finish it off.  I left the raw edges as is because I liked the frayed look.  


Now you should have 4 full triangle pieces.  


Next step is to simply hem the top and bottom of each piece.  Turn over the bottom edge of each triangle about half an inch and see along creating a hem.  

For the tops, we need to create space for a hole for the poles so fold the tops of each triangle over about 3 inches and see down to crest a finished edge.  

Now to assemble the triangles together.  

Place the triangle that has the opening for the door right side with one of the triangles with no seam up the middle (the triangle with the seam in the middle will go in the back).  With right sides facing eachother, see along one of the outside edges of the triangle to connect the pieces. 

Open it up and do the same thing, placing the other full triangle (with no middle seam) lined up with the triangle with the doorway, right sides facing eachother and sew together along the opposite side of that piece.  

When you open it up you should have the  front teepee piece with the opening in the middle with the 2 side pieces connected on either side.  

Now you just have to connect the back piece.  The one with the seam up the middle.  
Open up your teepee and place the last piece on top of one of the side pieces, right sides facing eachother and sew along the raw edges.  Then, connect the two last raw edges of your teepee together right sides facing eachother, and sew along the edge completing the teepee.  When you flip in right side out you will have a lot of fabric all connected!  


Now cut some lengths of ribbon ~18 inches (hopefully you have some on hand that you can use up and don't need to buy any!)

I simply reached inside the teepee and quickly centered a ribbon with each seam on the lower half of the teepee and stitched it down right along the seam.  Then repeated the process attaching a piece of ribbon to each inside seam on the upper half if the tent.  

The ribbons don't need to all be at the exact same spot in each seam, it's just to tie to the poles to help keep the seams lined up with the poles once you erect your DIY teepee.

now take your poles all gathered together and slide them up the middle of your teepee and spread them out. 


I then used some twine to tie up and secure the poles once I had them positioned the way I wanted them.


 Crawl/reach  inside your teepee and tie the ribbons securely around each pole.  


If you have your teepee on hardwood floors, consider throwing down an area rug or some canvas drop cloth to protect your floor from scratches. 


My son playing the drums I made as favors for his birthday party inside the teepee!


Later we hung a dream catcher great grandma had sent on the front


And added a basket to the side with play invitations, toms for playing the drums, feather headband, frayed t shirt, binoculars made if toilet paper tubes, a bear, bow and arrows etc.  

Spare throw pillows thrown in... Now not only are the kids drawn into this whimsical cozy space, but has become a new favorite napping place for the cats!  Which in the play world are wild cougars!!! Watch out!!!

Wednesday, April 8, 2015

Natural Pest Control

Well spring is here full on and so are all the critters, creepies and crawlers.  But we have got a pretty good pest control thing going on now.  Our 4 chickens eat bugs like crazy around here!  Our first year before chicksens here in the woods the spiders were so gross, I was just disgusted and freaking out all the time... Every window and shrub of the property had a giant ugly spider right in the middle.  Last year our chickens are then all, I saw only 1 big spider.  I also saw one if my chickens eat a garden snake the other day like a giant spaghetti noodle!  

When the chickens are locked up at night and no longer free ranging and hunting the bugs in the grass and shrubs, we have 4 bats that come out and hunt the moths, mosquitoes and flying ants all night.  I also hear an owl but haven't see. It.  

And, our boy cat has become a good hunter and is killing chipmunks and mice.  We had started to hear nice sounds in the cieling but since our cat has become a hunter I haven't heard anymore noises!  

So now I just need to figure out how to get rid of weeds easily and naturally without pulling them myself!  Lol 

But those chickens I tell ya....they more than earn their keep!  They lay eggs every day, they eat all the bugs, we put their pool in the compost which is supposed to be the best and they love going down to the compost like and scratching around...so they even airate it for us!  They also keep my kids entertained, and my toddler just walks around the yard with them...they eat all our chicken scraps so I never feel like anything goes to waste.  Seriously.... They are awesome!!!

Naturally Learning

Well in our journey this year away from curriculum and going back to basics with a more Charlotte Mason/Unschool/relaxed eclectic/delight centered learning approach, the fruits of this experiment have been sweet to say the least.  I mean  I know they say "never say never" but as of now I don't ever see myself buying a boxed curriculum again.  If there are certain tools or books we need or want then sure I may get some things a la carte but our days just feel so much more fulfilling, engaging, loving and inspiring without being boxed in and stressed out about the curriculum.  But this isn't an explanation/information post on homeschool styles, I just wanted to share a quick tidbit from our day as an example of "unschooling" and math.  

Yesterday I set out the board game Dino Tracks (a math game) on the table.  I didn't suggest playing it, just set it out on a clean clutter free table to be noticed.  That is strewing.  The kids asked me to play with them so I stopped what I was doing and got on the floor to play the game.  I took the problem solving cards aside and said "these might be too hard for you lets not use them in the game" (reverse psychology). So they begged me to set the game up using the problem solving cards.  One of the problem solving cards required division so I told my 5 year old son to get his calculator (he's been collecting them from the dollar tree and learning addition facts on them for fun he thinks it's amazing and is memorizing the facts as he always rechecks to see if he'll get the same answer each time and he also pretends it's his own iPad/iPhone. lol) and told him how to type in the problem and find the answer using division.  

Today, my daughter that just turned 8 picked up one of the big calculators that was in the baby's toy basket and started experimenting with division like I showed them during the game.  She showed me a couple of the answers she was getting and asked a couple questions and a light bulb went on in her head.  She started to understand basic division without me having to sit down with a lesson manual and try to explain it while we both become frustrated.  She was pretty exciting at her discoveries and continued on figuring it out for quite some time and now she understands a new math concept I had not set out to teach her today but it arose out of strewing, being engaged and flexible to stop what I was doing to play with them and most importantly, her own innate curiousity.  

We also had a math lesson on percentage in the car that randomly came about from another question.  And she totally understood.  

I love it.  I really learned that I can't just sit down and have an agenda tell me to input some specific information into her head on a particular day and if I don't then feel stressed because I'm getting behind.  Because really, I learned the hard way...if there is no reason in their mind to process the information...they won't... No matter how easy, fun, patiently and creative you try to present it....it's like potty training a kid before they are ready...you can start potty training as early as you want but it doesn't mean they will necessarily be potty trained any sooner, you may just have to deal with accidents that much longer.  

As for daily practice to get better at Math Facts, we've been using Xtramath and the Splash Math App.  If my daughter wants to use my phone or iPad to look up rainbow loom tutorials or play a certain game, she can if she does her math practice first and she actually reminds me some days to do Xtramath if I didn't remind her because she wants to earn the certificate to print off.  So getting practice with that helps with her recall of Math facts and then like I said, new Math concepts have been coming up just in our everyday conversations and games and some days she gets in the mood for her math book so we will take out her Singapore math book and whenever we do she gets really into it and does like 12 pages or more.  Usually at bedtime and that's why she wants to keep going lol! So I see it kind of like how toddlers eat.  Moms often worry because their toddlers diets are so eratic but then when you step back and look at what they are eating over the course if a week vs how much or little they eat every day, you see that it all balances out and they are getting eat they need.  

Math Strewing/inspiration for younger kids

Dino Tracks
Math War
7ate9
Card games like crazy 8s, war, go fish, solitaire etc.
Calculators as toys
Geometric pattern blocks
Containers to sort and count their nature collections (rocks, nuts, acorns, sea shells etc)
Rainbow Loom
Toy clock
Rock n learn DVDs time and money
Asking then to check the time for you often
Putting a dollar store calendar in their rooms and they can cross off and keep track of days themselves 
Let them help bake and read recipe and measure.  Take a moment to show them the equivalents.  
Math music -skip counting songs


Apps and websites like
Xtramath
Starfall
Splash Math
Math Ninja
Timmy's Kindergarten Time