Saturday, April 28, 2012

Scrappy Saturday


Hey!! TGIS!!!  (you know, thank goodness it's saturday!...some of my mops girls and I were reminiscing over watching TGIF during our round of mini golf last night, and then it came up again randomly tonight with other friends...)
Anyhoo.....here are some cool projects that were linked up last weekend, check them out and link up yours below! :)

T-shirt to skirt refashion by second chances by susan

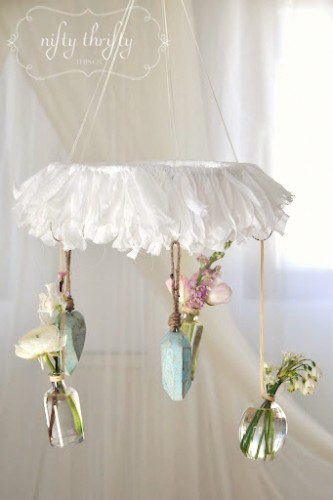
Wire Hanger Chandeliers by Nifty Thrifty Things

We Met we Married We Love by Queen B Creative Me

T-shirt Bracelets by Real Southern Living

Tile Coasters by Loopy Loop Creations

Now link up your awesome projects using scraps (of any kind), upcycling, redo/makeovers, and anything you made including materials you found or had on hand.  We love thrifty, resourceful creativity!

if you like this linky/blog you can follow me on GFC, Facebook, Twitter, Pinterest or vote for me on Top Mommy Blogs...:)

Visit some of the other links and leave some comment love :)

No Giveaways

grab a button below and post it with your other linky lists


Thursday, April 26, 2012

Homemade Potato Chips

Homemade Potato Chips
Oven Baked Dill Pickle Chips


I'm a potato freak...I can't believe it's taken me this long to make homemade potato chips as it's something I've always wanted to do.  I actually attempted to do it way back in grade 8 or 9 when I lived in Regina, SK but  I hadn't discovered parchment paper and it ended up with me scraping inedible potato crisps from the baking sheet all night...actually, maybe that failed attempt is why it has taken me so long to try again...it was incredibly disappointing (hey it was a lot of work slicing up those potatoes for a lazy teenager!).  Anyways...if you don't believe me on the being a potato freak statement earlier, when I was younger, I used to tell me family that when I grew up and got married I was going to live on a potato farm in Idaho with a cow for milk (used to be a milkaholic as well) and then I would have everything I need (except chocolate). (way to dream big Candace...lol)

Well, it's been on my mind to make some potato chips for forever since it's my favorite snack (I LOVE anything kettle brand esp. the cracked black pepper, and LAYS Dill Pickle.)  Growing up in Canada, my favorite flavors were Old Dutch's Dill Pickle Chips and All Dressed.  When I was in college and LAYS finally came out with Dill Pickle, I pretty much forced everyone to try them because I was SO happy to have that flavor in my life again and wanted to make everyone else like them so they would buy them too to prevent them from being discontinued.

So....I made Oven Baked Dill Pickle Chips.  I know the homemade potato chips have been done all over the place...but being a potato freak, my blog wouldn't be complete without a blog post about it. (reference is Pinterest search oven baked potato chips, there are tons and pretty much all the same).

Preheat oven to 400 (I did 425 but I will do 400 next time)

Thinly slice russet potatoes and soak in salt water
drain potatoes and pat dry


toss in bowl with olive oil to coat


Line a baking sheet with parchment paper
spread out potato slices in a single layer

Generously season with Archer Farms Sea Salt and Vinegar popcorn topping (from super target in the popcorn section) and Dill Weed. (or with whatever seasoning you choose-Kosher Salt, Black Pepper, Seasoning Salt, Garlic Salt, Onion Powder and Salt...etc.)

Place in oven for 15 minutes, then flip the potato chips over and bake 7-10 more minutes or until crisp.


Remove chips to paper towel or cooling rack to cool off


Enjoy!


Sunday, April 22, 2012

I'm a REAL Cook....I can throw stuff together....but then again...maybe I should just follow a recipe


Ever Get a Little Overconfident in the Kitchen?

I sometimes do and sometimes it turns out great (see the chocolate covered peanut butter chocolate chip balls) and other times...not so great.  Tonight I made a vinaigrette for the salad and thought I could whip it up all awesomely without a recipe or measuring anything.  My husband was the first to dig in and I was confused when I saw him throw his head forward and do some weird coughing thing...what was his problem...did he inhale a spinach leaf and need help?  Hmmm....not really...apparently my dressing was VERY strong...in an eating pure apple cider vinegar and black pepper kind of way.  I teased him and said "What?  That's how all vinaigrettes are made, plus apple cider vinegar is really healthy for you so it's basically a yummy health potion on your salad that I whipped up with no recipe!" and his reply...while choking on his food still was "Potion!!! That's exactly what it is! not salad dressing!" lol.  So then I was secretly scared to try it after his reaction but took a bite...I was like "Oh my gosh you are such a baby, I think it tastes fine..." followed by a sudden, uncontrollable head pulling back and jerking slightly from side to side as I tried to eat it as my whipped up salad potion had quite the zing...or something like that!  I am not even quite sure how to describe it...but I was reminded that...no. I'm still not a real cook...I do need references from cookbooks and online recipes so I don't wind up causing myself or family members to start choking on their food.


Saturday, April 21, 2012

Scrappy Saturday Linkup


Scrappy Saturday Weekend Linkup

Hey everyone!  So if I haven't mentioned this before or you haven't already noticed this about me...I can be kinda on the forgetful side...(I blame it on my thyroid..BUT not sure how much of it I SHOULD blame on that) anyways...so sorry no linkup last weekend but here we go for this weekend! :) Thanks to all of your who keep coming back even though I forget to set up the linky sometimes! You are the best! :)

Table Makeover by Little Mudpies

Owl Party (these are owl treatbags but visit the link for a ton of cute owl party ideas) by Trophy Wife

This is awesome!  Recycle plastic shopping bags by crocheting them into a reusable bag! by Mammy Made

Jelly Fish Jelly turned a plastic bottle into a little guitar!  I love upcycling!

Garage Sale Decor from Garage Sales R Us

Now link up your awesome projects using scraps (of any kind), upcycling, redo/makeovers, and anything you made including materials you found or had on hand.  We love thrifty, resourceful creativity!

if you like this linky/blog you can follow me on GFC, Facebook, Twitter, Pinterest or vote for me on Top Mommy Blogs...:)

Visit some of the other links and leave some comment love :)

No Giveaways

grab a button below and post it with your other linky lists


Friday, April 20, 2012

MOPS Crafts

MOPS Craft Ideas

As our MOPS year wraps up, I thought I would share some of the crafts we did that were all pretty simple and fun and went over well with our MOPS moms in case you are a craft leader and looking for some ideas for your group next year or just looking for some simple craft ideas that also make cute gifts. Some of the crafts we did this year were

Chalkboard Picture holder 

I made mine a counter downer for when my husband has to travel.  Other ideas could be birthdays, what's for dinner, or just where you leave love notes for your spouse or child...and whoever it's for you can stick a picture on the top in the little coil of them...I wasn't on the craft team at that time so I'm not sure where they got the idea or what the prep was like but it was fun.


Sugar Scrub

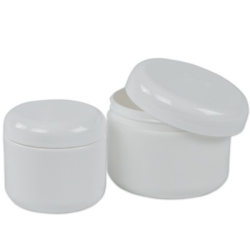
We purchased plastic tubs for less than a dollar a piece here.  Then just had the girls make a basic sugar scrub with white sugar, oil and a few drops or essential oil (optional).  Then we had stickers they could add as labels and some glued a wide ribbon around the container to decorate.  

Handmade Envelopes
Up-cycling 

Our theme for this craft was up-cycling, so we had magazines, catalog pages and newspapers that we put out for the girls to choose from.  We also had templates for them to cut out their envelope and then quickly assemble.  We just made these at our discussion groups because it was so simple, but it was really fun, easy, and I heard a few of the moms had fun using their homemade envelopes to send cards to friends and family.  We also put out some scrapbooking stamps and punches with cardstock for them to embellish with.  The Restoration Hardware catalog made awesome envelopes!  Here is a link with templates and tips for making your own envelopes.

Holiday Christmas Clothespins


This was a really inexpensive craft for the group.  We got the idea from Blue Cricket Designs  hot glued magnetic strips onto the backs of all the clothespins so they could be used as fridge magnets but as she mentions in the original post you could include a ribbon for them to be strung along a mantle for displaying Christmas cards.  What a fun little project!!!

I Spy Bottles 
(a sensory activity for the kids)

Two of our other craft leaders took on this project and dyed the rice, enough for 70-80 women!  Apparently they dyed it similar to the way you would dye easter eggs and then spread it out on tarps in their garage to dry.  Once it was dry they mixed it all together in a big plastic storage tub.  They also ordered clear plastic beef jerky containers Here but you could just recycle an clear plastic bottle too, using what you have on hand.  We then filled the containers with little things to spy such as foam letters, paper clip, buttons, a small butterfly bead, heart and airplane, penny, smiley face bouncy ball, a rubber band, star bead, frog and a marble. They made little labels with what is in side so the kids know what to look for and what they haven't found yet.  This one went over really well too, and the kids loved it!  We had it set up on 2 long tables, the moms came through, picked up a container, filled it 2/3 full with rice, then went through adding the various trinkets (we each bowl of things labeled with how many they should add such as 3 letters, or 1 of each for most of the other things), then they put some tacky glue on the inside of the lid and screwed it on.  Then used some clear packing tape and added the label and that was it!

Jars with Decorative Lids
from the Nate Burkus Show


So this project came from the Nate Burkus show and was really fun, you can see the tutorial here!  Those of us on the craft team took turns being in charge of each craft and our gal who presented this idea and took it on did awesome and she had to collect a lot of jars so we would have enough for everyone (70-80) and she pulled it off!  Thankfully her dad was also helpful in sanding, drilling the holes, and spray painting the lids although if you were to do this on your own, you could just use a nail and hammer to make the hole in the lid.  Also her dad was helpful in trimming the screws on the knobs, she picked up a lot of cute knobs at Hobby Lobby 50% off and the screws were really long.
Anyways, we had three stations set up so when the moms came in, they first went to the table with the knobs and picked out the knob they liked and then chose a station to create their jar.  The stations we had were candy, they could fill their jar with mints or taffy.  The next station was a beachy votive jar, filled 1/3 with sand (we bought a big bag of play sand) and then put a tea light candle in the middle and sprinkled in some small stones and sea shells (from the dollar store) around the votive.   The third station was to fill your jar with bath salt.  We had a tub of epsom salt and then set out the essential oils we had left over from the sugar scrub project we had done previously.  They added a few drops of essential oil to their salt and stirred.  Then they added a cute little scoop that she picked up at a party supply place meant for appetizers or something, but it worked really well in the jar with the bath salt.
This project was fun because there are so many ideas of what you can put in the jars...if you decorate a mason size jar or old spaghetti sauce jar, you could fill it with layered soup mix or cookie mix to give as a gift, smaller jars you can use for toothpicks, candy, teabags, sea shells, rocks, cotton balls, pencils (a great teacher gift) or whatever else you can think of!  


Tuesday, April 10, 2012

Peanut Butter Chocolate Chip Chocolate Easter Eggs

Chocolate Covered Peanut Butter Chocolate Chip Eggs
gluten free and dairy free

For Easter this year, we had to make our own chocolate treats to avoid gluten and dairy.  I saw multiple blogs that had made peanut butter chocolate eggs but I've made peanut butter balls before and wasn't interested in the 1 cup peanut butter to 3 cups powdered sugar recipe.  I then looked up "chocolate chip peanut butter balls" and found this video on youtube for raw vegan peanut butter balls and that kind of inspired me to create these.

Chocolate Covered Chocolate Chip Peanut Butter Balls (Eggs)
Peanut Butter (I use Natural Jif or Skippy)
Raw Almonds
Ghiradelli semi-sweet chocolate chips
honey
vanilla
a little powdered sugar (optional)

There are no exact measurements, you just add dry ingredients until you get the dough the to right consistency for being able to roll into balls.

In a food processor (this is a mini one) grind up your almonds to make almond meal, leaving some small bits intact as in the photo below.

 In a large bowl (or kitchenaid mixer if you have one) add a bunch of peanut butter.  This is probably around 1 1/2 cups or so...doesn't really matter.

 Add a tsp of vanilla and a tablespoon or so of honey, then add in all your almond meal and mix together.

After adding all the almond meal, it wasn't quite thick enough and since I didn't feel like grinding up more almonds (my cheap processor is going to make me go deaf!) I just turned to mixer on low speed and slowly added a little powdered sugar until it formed into a ball, it didn't take very much at all....maybe a 1/4 cup?  And you could leave out the powdered sugar and just add more almond meal for a healthy snack.

Roll into small balls (or ovals to make easter eggs) and place on a tray or plate, cover with plastic wrap and set in freezer.  You can enjoy these just like this, they are not too sweet but still a super yummy treat.  You'll satisfy your sweet tooth without feeling sick after because the peanut butter is decently sweet and that little bit of honey adds some sweetness as well.

 To take these a step further...and it's worth it...add a cup of your chocolate chips to a microwave safe bowl and microwave for 1 minute, stir, then microwave at 30 second intervals stirring each time until smooth.  Using a fork, roll your chocolate chip peanut butter balls in the melted chocolate and then set back in the tray.

Once they are all covered, set in the freezer again to harden the chocolate.  We just kept ours in the freezer and ate them cold because they were so yummy like that, kind of like eating frozen cookie dough but better, and they were still soft, not too hard from being frozen.

My husband is not big into sweets but he was totally into these and my daughter was obsessed with them as well, so I was pretty excited with how yummy they turned out without having to use anywhere near as much sugar as traditional peanut butter balls.


Saturday, April 7, 2012

Scrappy Saturday


Happy Easter everyone! I hope you are enjoying your weekend thus far! Here are some of the cute Eastery projects from the last link up, hope you enjoy and add some more!

Bunny Skirt by Ocean of Notions

Easter Crafting DIY by Dear Creatives

Butterfly Eggs by Ellens Creative Passage

Easter Egg Wreath by Artsy Fartsy Mama

Sock Bunny Tutorial by Suburban Prairie Homemaker

Now link up your awesome projects using scraps (of any kind), upcycling, redo/makeovers, and anything you made including materials you found or had on hand.  We love thrifty, resourceful creativity!

if you like this linky/blog you can follow me on GFC, Facebook, Twitter, Pinterest or vote for me on Top Mommy Blogs...:)

Visit some of the other links and leave some comment love :)

No Giveaways

grab a button below and post it with your other linky lists


Wednesday, April 4, 2012

Easter Mantel and Peeks of Spring

Easter Mantel

and peeks of spring as it comes...


I just remembered this chocolate ceramic east bunny that my mil gave me last fall and was excited when I realized I actually DO have some Easter decor!  The white pitcher was a gift from a long time forever friend last year and the topiary is from tj maxx, I had it in the kitchen but moved it over to the mantel today.  The glass hurricanes are from the dollar tree along with the candy inside (left over decorations from the birthday party).  The white pitcher is holding a coffee filter flower bouquet that J made with my mom while they were here last week, an oldie but goodie project you can view here. It's simple but it's nice to have something different up on the mantel, it's lighter and more colorful than what I had before.  I must admit my friend Whitney inspired me to look around and find something to decorate with because she always has her house SO cute and perfect for every holiday and season.  If she ever changed jobs she would be great as a personal organizer, shopper, decorator, etc.

And over the past 2 weeks, spring has really come on strong with wonderful 70-80 degree weather!  And while my parents were here last week my dad was going around fixing things...like the toilet upstairs, the sliding door on the van and even our fountain!  We have tried to figure out how to turn it on since we moved in the house and gave up... apparently it just needed a new pump, my dad solved the problem and got it up and running and I LOVE it...I open my windows in the morning and then get back in bed and listen to the birds and the water trickling outside....ahhh....

 With all the blossoms coming out, I decided it was time to set up the hammock!


I LOVE SPRING!!!
Has spring made it's debut where you live yet?  I know we are lucky it came kind of early for our area, making it an easier transition from leaving Dallas, where the tulips were out in February...still miss it though!