Showing posts with label spray paint. Show all posts

Thursday, August 2, 2012

Chalkboard Pedestal Table Makeover

Chalkboard Pedestal Table Makeover


So about 2 weeks ago I was driving to the dollar store and as I drove past the thrift store in the same strip mall, they had this octagon pedestal table out on the sidewalk.  I decided we hadn't looked there in a while so we stopped and I walked up to the pedestal table and saw that it was marked down from $10 to FREE.  Suddenly I hear Jordan squealing because she found a princess scooter parked out front too and has been wanting one for a long time.  It was a whopping $2.98.  So we got the princess scooter and I heaved that pedestal table quickly into the trunk of the minivan (yes I love having a minivan now...never say never!!!)  I didn't look at it more than a few seconds, long enough to see it was free and so I just grabbed it, we were in a hurry.  Later, I realized the table was pretty gross looking, but kept it in the back of the van for the rest of the week (I couldn't get it out myself this thing is SOLID and HEAVY!)


When My husband finally saw it, he was like what in the world!?!? Why is my wife driving around with this nasty disgusting table in the back of her van all week?  We were all together in the van that weekend and I didn't know what to do with it and we are already busy trying to sell our house...so I said "fine lets just drop it back off at the curb on the way home...but when we got close...I couldn't do it and said "give me a week to figure out what to do with it and if I don't know we'll dump it back off".


When I FINALLY took the pedestal table out of the minivan, I knew even LESS what to do with it at first...I had originally thought it could go in the dining room with a vase of flowers since we have no table and it's pretty empty, I was thinking to paint it with the dark espresso paint we used on the cabinetry in the bathroom.  But once I stood next to this octagonal pedestal table, I realized it was not only disgusting and filthy, it was a really weird height...too tall for a coffee table...too short for any adult to sit at.  I also realized the top swivels around.  What in the world was this table EVER used for?  I thought okay, well I have to take it back, no wonder it was free....it's the weirdest table ever!  And went inside.

Let's spin it around to a new spot

Later, when I was in the garage with my daughter riding her scooter, I realized the table was a great height for kids and decided to keep it and make it into a fun activity table.  I've been wanting to try a chalkboard paint project for a long time so this was my chance.  A gave the table a good soapy wash down and lightly sanded the table top but not the base.  I let my daughter pick out the spray paint for the base of the pedestal table ( After I told her no pink or purple...)  I even let her help roll the chalkboard paint on the top!  It was a pretty simple project, did a quick coat of spray primer BIN 123 (i think it's called) all over.  Then spray painted the base turquoise which took no time at all.  And got a good enough covering in 1 coat with 1 can.  The next day I taped around the edges of the table top and we just rolled on our Rustoleum Chalkboard Paint and repeated 2-3 times throughout the day...but each coat only took 5 minutes to roll on with a foam roller.  So, I'd say the most effort put into this free pedestal table was getting the heavy ol' thing into the back of my car MYSELF!  I noticed people driving by slowly, watching me struggle probably either laughing or contemplating helping me before I broke my back but I managed.


The kids L-O-V-E their new pedestal chalkboard table!  We put it in the den in our basement so the lighting isn't great in the pictures but it's a good spot for it.  The kids love drawing in one spot, then spinning the top around to get to a fresh spot and then wiping it down with rags when they want to start fresh.  I put some sidewalk chalk in these cute little metal buckets I had picked up at the $1 section at Target for them to use.


J was drawing Caillou and his family for B...he kept asking someone to draw Caillou...Rosie, Cat...Caillou mommy and Caillou Daddy and J was more than happy to meet his request.


Tuesday, July 17, 2012

Cheap Easy Light Fixture Updates And Bathroom redo 2.0

Cheap Easy
Light Fixture Update
Photobucket

So The bathroom makeover I did wasn't quite finished when I posted the reveal....since then I painted the cabinet and the trim dark brown using Behr French Roast and it looked great.  I also used that Satin Acrylic Latex Enamel from the Fireplace Update and painted it on the gold hinges with my daughters small watercolor brush...so I wouldn't have to take the hinges off and repaint them!  and I FINALLY updated to gold light fixture...we were planning on buying a new light fixture we liked....only all the ones we liked were more than we wanted to pay so we hadn't done anything....until now...of course that we are selling the house...getting everything finished and polished for someone else to enjoy :(


bought oil rubbed bronze spray paint and just took the ugly gold fixture outside and gave it a spray and had the hubby put it back up.  We also spray painted the ugly gold fixture in the basement bathroom too and it's such a small, cheap thing to do but yet is a major improvement. The spray paint was $7 and I updated two light fixtures with it with more to spare...basic bathroom light fixtures start around $50 so this is definitely the best way to go unless you just feel like splurging on a light fixture...

Here is the basement light
Photobucket

And Here is the the final picture of the bathroom makeover that I never showed you with the cabinet and baseboards painted French Roast and the hinges painted black.

Photobucket


Thursday, June 7, 2012

Pink Ceiling Fan Chandelier Makeover


  DIY Girls Ceiling Fan Chandelier
So this is a recent project I completed but took a while to share because I had to wait for my hubby to have time to install the fan.  This white ceiling fan had gold hardware and used to be in the master bedroom, we updated our room with something we liked better but our daughter J said she thought the white fan was beautiful and wanted it in her room.  She had an older uglier brown and gold ceiling fan light fixture in her room.  So I got some Rust Oleum in Berry Pink GLOSS and quickly took the fan apart which was super easy and spray painted the hardware pink.  Once it was installed and hanging up, I draped these jeweled garlands that I found in the wedding section at Hobby Lobby they were maybe $5 each or less with 50% off.  For the beaded strands in the center of the chandelier fan, I used some jewelry wire to attach  it to the bottom of the fan as you can see if you look closely.  It took a long time to get this project fully complete...but the project itself was really easy and quick to do...just got drawn out because it didn't match the mounting hardware from the old fan and hubby didn't have time right away to hang it...but here it is...my daughter loves her pink chandelier fan!  We have been turning her fan on at night and if we keep it on the low setting, the jewels on the chandelier don't jiggle around much at all...but on the 2nd and 3rd settings they begin to sway and make some noise so if you want to do this just keep that in mind and make sure you just use the fan on the low setting.

Stay tuned for more reveals from my little girls bedroom makeover! :)

Simply take your fan apart, keep track of where everything goes and then lay out on cardboard and paint with a glossy spray paint.  When paint is completely dry, reassemble your fan.

Install ceiling fan (see owners manual instructions if needed)

Drape jeweled garlands over the lights and metal posts.

Using jewelry wire, attach beaded/jeweled strands to hand from the center of the fan.

ENJOY!  SO CUTE AND GIRLY!  

Spray paint $4
Jeweled garlands $10-15 roughly

Update and turn an old ceiling fan into a super cute girly chandelier fan for less than $20!!!


Friday, August 26, 2011

Doll Bed Before After

Doll Bed 
Before & After

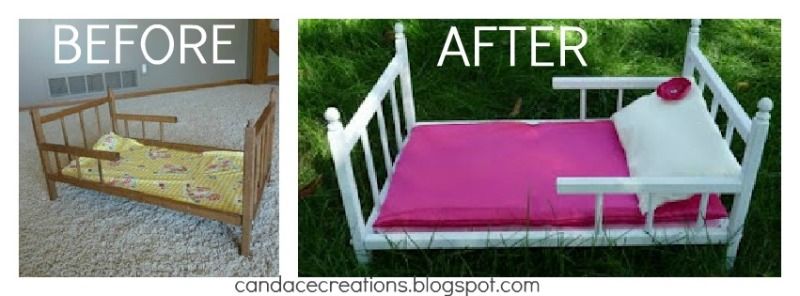
Earlier this summer I picked up this little doll bed at a yard sale for 25 cents...


It must have been the lower part of a doll bunk bed because it just had those little dowel pieces sticking up on the end of each post...it also had that old yellow vinyl glued to a board for the mattress.

I found these Dowel toppers at hobby lobby for like $1.27 for a pack of 4 and stuck them on the tip of each post...but there was still a bit of a gap so I filled it in with caulking that my husband had left on the work bench from doing the windows.

Then I lightly sanded the doll bed, removed the vinyl and spray painted the bed white (MY FIRST SPRAY PAINT JOB!) and painted the mattress board light pink.


(Yeah I know the grass is too long, we need to buy a new lawn mower!)

 
I made the pillow with the fabric that WAS the lining of the curtains I used on the crib bumper pad (the shinyish slate blue fabric was a curtain panel on clearance and was just the fabric I had wanted!) The pink fabric was also just sitting in my stash.  I learned about these sweet little circle flowers with the burnt edges from Crystal over @ Wanna Be Balanced, they are really simple and I plan on making a lot more of these in the future!