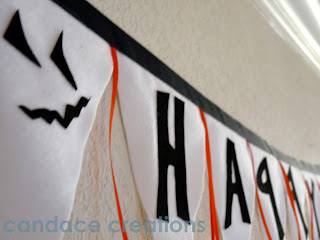
No Sew Halloween Banner Tutorial
supplies
1 sheet stick back black felt
1/2 yard white fabric (I used flannel)
1 inch wide black ribbon
1/8 inch wide orange ribbon
scissors
glue gun
Cutting board & Rotary Cutter (optional-makes it easier!)
1. Trace or free hand the letters to spell out HAPPY HALLOWEEN on the back of your sticky black felt BACKWARDS.
Don't make the same mistake I did and end up with backwards letters (see how the P's turned out?!). I realized I needed to reverse the rest of my letters in time to fix the rest, I just cut them opposite than what I had originally drawn. I could have gone back to the store and got more felt to fix the P's...but I'm notorious for making mistakes like that so I figured I'd just leave it that way...it's almost a tradition, I always mess up something simple!
Since you need to cut the letters in reverse so they are facing the right way when you stick them on the Halloween banner, it might be easier to draw a template or print a template, cut out the letters, then place them on the back of the felt BACKWARDS and trace them so it looks like the above picture. My letters are just about 3 inches tall.
2. Cut Letters out and set them aside.
3. Cut out 16 Triangles.
I made my triangles 5 inches wide across the top and 7 inches long.
As you can see in the pics below, I stacked up my fabric 4 layers thick while cutting to speed up the process, that's where the rotary cutter and board come in handy, but you can always cut these out with scissors.
Peel off paper backing on felt letters and apply them to the triangles.
I cut out shapes for the jack-o-lantern faces from some of the scraps.
Cut the orange ribbon into thirty 9 inch long strips.
Using a glue gun, start gluing the triangles to the black ribbon starting with the end
(so you start with a pumpkin face, then N-E-E-W-O-L-L-A-H-Y-P-P-A-H-and then last pumpkin face.) Also be sure to leave 10-20 inches of ribbon on each end for hanging) Glue two strands of orange ribbon between each triangle.
Hang up your Halloween Banner!


8 comments:
Great tutorial! I may have to try this for my sons bday next week!
Hi. I'm your newest follower from Twee Poppets... would love for you to follow me too (- :
Malia
www.yesterdayontuesday.com
wow! loving this! I'll have to try it myself :) so glad you stopped by my blog, I'm following you right back and really happy that I am!
Thanks for following me-I am returning the love:)
Thank you so much fro stopping by. I am follwoing you back. Have a great Wednesday!
Hi! I thought you did those backward P's on purpose. Great tutorial! I'm a new follower. :)
I'm doing my first giveaway (CSN $35) stop over and enter if you get a chance.
Enjoy the week! :)
Alison
http://welcomesunshinehome.blogspot.com/
Hi there! Stopping by from Twee Poppets. What a fabulous banner...I love how you did it! I am a new follower!
Holly
504 Main
Hi Candace, I'm you newest follower, hope you'll stop by and follow me. I love your banner, I've always wanted to try making one. You have inspired me. I like your music.
Post a Comment