Saturday, October 22, 2011

Scrappy Saturdays # 9

Scrappy Saturdays # 9

Happy Scrappy Saturday!  So glad you are here! It's getting so close to Halloween, are all your costumes and decorations ready?  As of now, I still have quite a bit to do!  I am also getting ready for my first arts & crafts fair on the 29th and I don't really know what to expect but I'm just trying to enjoy getting stuff done and ready for that and see how it goes!  Any tips? I kind of have this feeling that I think my stuff is decent and then I'll get there and see the other vendors tables and be embarrassed!  Whatever happens, I'm taking it as a learning experience :)

Well, here are the featured linkups from last week...

Sweet Water Style made up these knock off halloween decor books, I love the look! I need me some of these for my mantle!

This Halloween Wreath is so fun by artsy fartsy mama. Thanks for sharing the tutorial!

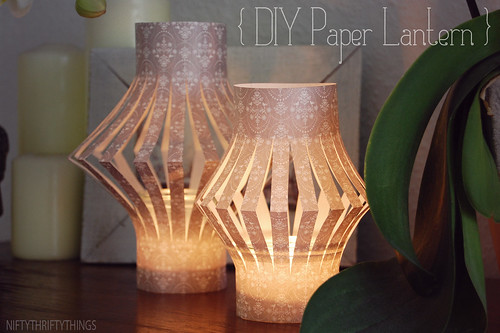
Check out these awesomely creative DIY paper lanterns by nifty thrifty things

And this project right here is right up  my alley!  I love making things like this for my kids to play with, like the diamond castle.  This sweet Fairyland project was created and posted by jellyfish jelly.  You really do need to go to the post and see the close-ups!


Alrighty, if you've been featured, you can grab a brag button here

if you like this linky/blog you can follow me on GFC, Facebook, Twitter, Pinterest or vote for me on Top Mommy Blogs...:) 
Visit some of the other links and leave some comment love :)
No Giveaways
grab a button below and post it with your other linky lists


Get your own linky tools HERE


Friday, October 21, 2011

Sneak Peak at my inventory in progress!

Since I keep mentioning I'm getting ready for my first arts and craft fair, I thought I'd give a sneak peak at my works in progress...some finished...most not so finished...I'm a big procrastinator....I work better under pressure! haha!  A self induced curse sorta, my younger bro is the same way...:P  (love ya Joey!)

Anyways, today I will be assembling a lot of the headbands, everything is ready to go! I'd like to make some more ties, I have other fabrics I haven't gotten to yet but we'll see!  I have a love hate relationship with sewing due to my $50 brother sewing machine from walmart!  If I don't want to totally kill my motivation to sew things I'm going to have to upgrade to a better sewing machine in the near future!  I have made a lot of stuff with that sewing machine but man, every other seam the tension seems to magically change by itself, or the thread jams, breaks, and I might break my seam ripper before I break my machine!!! Anyways...ok that's not what I'm blogging about so onto some pics..

I think there are around 30 finished ties....I hope to get a few more done and some bow ties too. These neck ties have been like, almost a year in the making...well since the beg of this year when I whipped one up for Bronson's birthday pictures and have been wanting to make more.  These are more of a fall winter collection of fabrics....
 Appliqued scotty dog
 green houndstooth
 classic plaid
 brown houndstooth tie
 love yellow and grey
 rusty orange houndstooth tie
 neutral applique deer tie
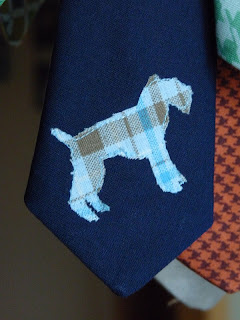
 applique terrier dog tie on a classic preppy navy blue fabric

 black and grey skinny ties for the hipster babies/kids
I wasn't planning on doing headbands originally, but needed a break from my sewing machine and the ties and after my sister loved the headbands I sent for her baby girl, I started getting into it.  I knew how to make the rolled fabric flowers but Crystal from wannabebalanced got me addicted to making these flowers where you singe the edges.
 
I got the crochet headbands in the ribbon section on spools so I had to cut and sew them to make the headbands, there were smaller sections left over so I made a couple bracelets with the leftovers..I also have some brown crochet bands to sew and some of the brown stretchy ribbon lacey kind like that white in the picture.  I'll have to post some of the finished headbands when they are all done
 Head bands sewn and ready to be decked out
Here are some of the flowers for the headbands and bracelets, i enjoyed embellishing some of the flower edges with glitter...adding a little bling!

 
I have more canvas art to make

yeah....i need to organize this room a bit (yes it's a disaster!)....That's why I keep the door closed.


Wednesday, October 19, 2011

Glowing Rapunzel Hair Tutorial

Glowing Rapunzel Hair
Just like in Tangled!
"I have magic hair that glows when I sing!"


Rapunzel is one of our favorite movies...that's right "our"...I can't help but sit and watch it with my 4 year old!  Up until about a week ago, she planned on being snow white for Halloween, which I thought was great because she was snow white last year so we already had the costume.  Well, when she decided to be Rapunzel, I got kind of excited.  At first I wanted to get the Rapunzel costume and wig from Costume Express when I won their giveaway recently but they had already sold out for the season.  I found this rapunzel braid on Amazon Here for about $30

And then saw this awesome glowing Rapunzel hair party decoration on Etsy Here

And then knew exactly what to do for J's Rapunzel costume.  Make a glowing long Rapunzel braid that glows.  This was rather quick and easy to make and cost less then $5!

What you need
Battery powered short strand of mini lights
(found at hobby lobby for $1.99)
Purple ribbon
yellow yarn 
(more of a buttercream yellow and the thing of yarn is 355 yards, buy 2 packs if this is for a teenager or adult)
3 ponytail elastics
scissors

 Measuring
 Take the end of the yarn and measure around your child's head creating a crown and then let the yarn hang down to the floor, notice where the yarn touches the floor then add a bit more length for good luck, and snip.  This is your guide piece for measuring out all the strands of hair.   (or however long you want it)


 Making Sections of Hair

Lay the guide strand out across the floor nice and strait.  Then, hold then end of the yarn and just unroll it till it gets to the other end, then hold it down on the opposite end and loop it back the other way, working your way back and forth, until you get a nice thick row of hair.  I made each section of hair about the thickness of a quarter when you grab it.  So Once you get a row of thick hair, repeat that process 2 more times till you have 3 rows of thick long yarn (hair).  Remember you are just rolling the yarn back and forth, not cutting out individual strands
 Braiding it

Carefully bring all 3 sections side-by side.  Come down about 3 inches from the top and secure with a hair elastic or rubber band. Slip your purple ribbon in there with the elastic next to one of the sections of hair.  Start braiding the hair all the way down, Incorporating the ribbon as you go.  When you get a couple inches from the bottom, secure with another hair elastic or rubber band. 

OPTIONAL: If you want the lights to be in the hair permanently, then see the step below for where to put the battery pack, and then incorporate the strand of lights into the braid as you do the ribbon, being sure to keep the wires and lightbulbs from showing as best you can.  If you want to be able to take the lights off, continue below, leaving the lights for last.


 Model and Fit

Get your child and wrap the braid around their head like a crown and then secure in place with an elastic, making sure to tuck the loopy ends under the braided part so you don't see it.  Tie a piece of ribbon around the elastics at the top and bottom to hide them and make it pretty :)  I left the end of the braid as is, but you can trim the ends if you like.


 see the loopy ends on the underside of the braid where you connected it with elastic?

Make it GLOW

Lay your Rapunzel braid on the ground upside-down so the you are looking at the loopy ends that are hiding under the braid...Put 3 fingers through the loops and try to line up the loops of frabric as much as you can...mine weren't all perfectly even so I didn't get all of them, but enough to hold the battery pack.  Tuck the battery pack inside those loops.  Now, turn the switch to one and start spacing out your lights and tucking them into the braid to light it up.  Once you have all the lights placed in the corrects areas, you can either use strands of yarn to tie the lights in place which can be snipped for easy removal later or use some small hair claws/clips to secure the lights and wires in place.  

The reason you may want to make the lights removable and not incorporated into the braid is it is a little heavier with the battery pack and your little one may not always want to have that in there when playing, but for halloween and other special dress-up events, the lights just take this long Repunzel hair accessory to the next level of coolness while also making your kid more safe and visible on Halloween night!


This Repunzle braid is super fun without the lights too!

You can add fake flowers to the braid to make it more like the movie, I plan on doing that I just haven't picked up any yet.  I did have one that I stuck at the top of the braid as you can see... 


Let's see the battery lights were $1.99 and the yarn was $3.99 but I had a 40% off coupon so this fun repunzel braid cost less than $5 to make!


I picked up some fabric and plan to make an actual repunzel dress using the cinderella dress tutorial from make it and love it.  But if I don't end up having time at least she'll have this purple dress or maybe borrow a repunzel dress from a friend and make the handmade one for Christmas....HOPEFULLY I can get it done for Halloween though!


UPDATE!

While linking this up to parties I found this awesome RAPUNZLE DRESS TUTORIAL by Me Sew Crazy!  Can't wait to try it!

(and apparently there are already lots of braided yarn tutorials out there, I didn't realize!  Well, hopefully I inspired some new ideas by adding the battery powered lights :P)

I also saw this cute flynn ryder costume by crazy town welcomes you...I was thinking maybe my 18 mo little guy could be either Flynn Ryder or Pascal...


Saturday, October 15, 2011

Scrappy Saturdays #8

Scrappy Saturdays Week 8
or should I say crappy Saturday because I blew it!!!

Hey you guys!  yeah....HEY YOU GUUUYYYS!  um, don't know why I was thinking about the Goonies, but anyways, sorry to anyone who came to link up earlier today and wasn't able to...I know. so annoying when Link Parties don't show up when they are supposed to! I had such a busy, tiring week I may have lost my mind a few times...like last night I was cleaning up after dinner and my husband asked why I threw all the good untouched chicken off my daughter's plate down the drain rather than put it in the fridge....um...as I was telling him "I didn't even think about it..."  I realized I was spraying water all over the countertop instead of in the sink where I was supposed to be spraying dishes....um....yeah.  that kind of gives you an idea of how my brain functioning has been this week.  So I spaced on the blog this weekend...oops! 

ONTO THE FEATURES! YOU GUYS ARE AWESOME! And Inspire me so much each week with all your creativity and great ideas and I love seeing how everyone's projects turn out!

What beautiful freehand artwork!

I immediately fell in love with these Fabric Bookmarks!  These are so adorable, would make great gifts and I think anyone with a little bit of sewing scraps would be able to make quite a few of these babies!!!  Check out the tutorial at Quiver Full of Blessings.  I love the rolled rosettes on them.

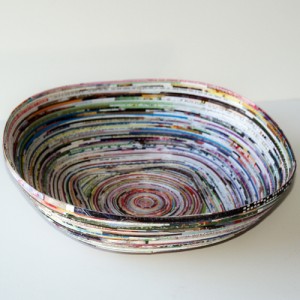
Now this is one of the most original projects I've seen, using old magazines to make a magazine bowl! WOW to Saved by Love Creations, thanks for sharing, can't wait to see that video tutorial!

I can't go on without featuring one of the great seasonal projects linked up! I love these mummy vases! I want to make some for my mantle!  Looks like a quick and easy project....right up my alley!!!  Check them out at Freaking Craft.

I Love this patchwork pillow as a way to use up scraps of fabric! Check out the tutorial from vixenMade.


Alrighty, if you've been featured, you can grab a brag button here

if you like this linky/blog you can follow me on GFC, Facebook, Twitter, Pinterest or vote for me on Top Mommy Blogs...:) 
Visit some of the other links and leave some comment love :)
No Giveaways
grab a button below and post it with your other linky lists


Monday, October 10, 2011

PopEye the Stick Man

Meet PopEye the Stick Man
no relation to spinach sucking sailors

Today we had a BIG mess on the table of all our random arts and crafts supplies.  My 4 yo daughter and I decided to make a little puppet toy for her baby cousin when we found this red Popsicle stick and one big googly eye....hence the name....Popeye.....
J glued the eye on and then we were looking around out stash for some hair...hmmm..this blue octopus foam sticker turned upsidown looked fun and then all we needed was our pipe cleaners.  

He makes a really fun pet

Popeye loves the outdoors


He knows how to drive


He's popular with the ladies


 He's housetrained


 He's on top of the fresh breath thing


And he's very.....


studious....


He can teach your kids all about the number 8


Now he will make a very low maintence first pet for our baby belly dancing Rainbow Gotters.  J says her mommy and daddy will play peek-a-boo with him while Rainbow Gotters is in the crib and do puppet shows for her.

Who is Rainbow Gotters? (my newborn niece)  And yes she belly dances...